Custom-Built Pergolas: Add Shade and Style to Your Outdoor Space

Source:https://hips.hearstapps.com

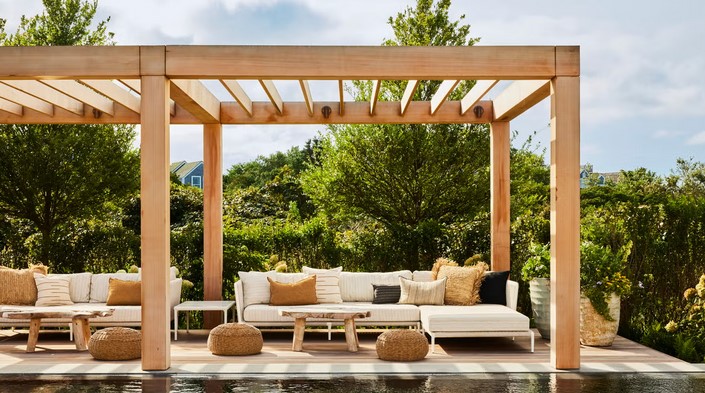
When it comes to enhancing your outdoor living space, few features combine style, function, and versatility as well as a custom-built pergola. This architectural structure, typically consisting of an open roof supported by posts, creates an inviting space where you can relax, entertain, and enjoy the outdoors without being exposed to the full force of the sun. A pergola not only offers shade but also adds a touch of elegance and sophistication to your backyard, patio, or garden. Whether you’re seeking to add value to your property or simply create a more comfortable outdoor retreat, a custom-built pergola is a great investment. In this article, we’ll explore the benefits of custom-built pergolas, the design options available, and how to create a space that suits your needs and style preferences.

Why Choose a Custom-Built Pergola?

A pergola is more than just a simple outdoor structure—it’s a design element that can transform your space. Custom-built pergolas, in particular, offer a wealth of benefits, making them an attractive addition to any home. Unlike prefabricated or mass-produced pergolas, custom-built versions are tailored to your specific preferences, giving you the freedom to design something truly unique that matches the architecture of your home and the vibe of your outdoor space.

Personalized Design

One of the key advantages of custom-built pergolas is the ability to personalize the design. When you choose to have a pergola custom-built, you can dictate everything from the materials used to the dimensions, shape, and features of the structure. Whether you prefer a classic wooden pergola, a modern steel design, or something in between, the design options are endless.

A custom pergola allows you to:

  • Choose from a variety of materials, such as cedar, redwood, pressure-treated wood, or metal.
  • Select colors and finishes that complement your home’s existing design.
  • Determine the size and height to suit your outdoor space.
  • Add unique features like integrated lighting, retractable canopies, or climbing plants for a more natural, shaded effect.

With a custom-built pergola, you can create an outdoor feature that is not only functional but also a true extension of your home’s aesthetic.

Enhanced Functionality

Custom pergolas aren’t just about looks—they also serve a practical purpose. They can provide the shade and protection you need to enjoy your outdoor space during the hot summer months, making your patio, garden, or backyard more comfortable. By adding a pergola, you can create a designated area for dining, lounging, or even working outdoors.

Here are a few functional benefits:

  • Shade and Cooling: A pergola helps reduce the direct sunlight that reaches your outdoor seating area, making it cooler and more enjoyable during the heat of the day.
  • Outdoor Entertaining: With a pergola, you can easily host outdoor gatherings, dinners, or parties, with the comfort of shade and a touch of style.
  • Privacy: A pergola can offer some degree of privacy, especially when you add curtains, trellises, or climbing plants like vines, which provide an additional layer of seclusion from neighbors.

Custom pergolas can be designed to meet your specific needs, whether it’s for outdoor dining, creating a garden retreat, or serving as a place to relax with family and friends.

Types of Custom-Built Pergolas

The beauty of a custom-built pergola is that it can be tailored to fit any style or functional requirement. Let’s look at some of the most popular design options available for custom pergolas.

1. Wooden Pergolas

Wooden pergolas are a classic choice that adds a natural, timeless appeal to any outdoor space. The rich texture of wood and its ability to blend seamlessly with nature make it a perfect option for gardens, backyards, or rustic-style patios. Cedar, redwood, and pressure-treated pine are some of the most common types of wood used for pergolas.

Wooden pergolas can be stained or painted to match your home’s exterior or to create a natural finish that weathers beautifully over time. Adding climbing plants like ivy or wisteria to the structure can enhance its rustic charm and provide additional shade.

2. Metal Pergolas

For a more modern or industrial look, a metal pergola might be the ideal choice. Metal structures offer durability and a sleek, minimalist appearance that pairs well with contemporary or urban outdoor spaces. Steel, aluminum, and wrought iron are commonly used materials for metal pergolas.

Metal pergolas are known for their strength and longevity, requiring minimal maintenance compared to wooden pergolas. They can also be powder-coated in a variety of colors to suit your home’s design scheme.

3. Retractable Pergolas

A retractable pergola is perfect for homeowners who want the flexibility to control how much sun or shade their space receives. This type of pergola features a retractable canopy that can be opened or closed depending on the weather or time of day.

Retractable pergolas can be operated manually or motorized for added convenience. They are ideal for those who want the benefits of a pergola but prefer the option to adjust the amount of sun exposure during different seasons.

4. Freestanding vs. Attached Pergolas

Custom pergolas can either be freestanding or attached to the side of your house.

  • Freestanding Pergolas: These pergolas are independent of the house and can be placed anywhere in your yard or garden. They are ideal for creating distinct outdoor rooms or focal points in your landscape design.
  • Attached Pergolas: An attached pergola is typically fixed to the side of your house, often above a patio, deck, or balcony. This type of pergola can help create a seamless transition from your indoor living area to your outdoor space.

Both options offer a unique way to enhance your outdoor living area, depending on your available space and desired aesthetic.

5. Pergolas with Built-in Features

Custom pergolas can also include a variety of built-in features to enhance both form and function. Some popular add-ons include:

  • Lighting: Install integrated lighting fixtures such as string lights, lanterns, or recessed lights to create an enchanting atmosphere in the evening.
  • Ceiling Fans: For added comfort on hot days, a ceiling fan can be installed to circulate the air and keep the space cool.
  • Built-in Seating: Create a more functional outdoor area by incorporating built-in seating or benches along the sides of the pergola.
  • Trellis or Vine Coverage: Adding a trellis to the sides of your pergola or allowing climbing plants to grow can increase shade, privacy, and visual appeal.

These additional features can elevate the design of your custom-built pergola, ensuring it meets all your aesthetic and practical needs.

Installation and Maintenance of Custom-Built Pergolas

The process of installing a custom-built pergola typically involves several steps, including planning, measuring, material selection, and construction. It’s important to work with a professional contractor or a skilled DIYer if you’re looking to ensure your pergola is built correctly and safely.

Installation Considerations:

  • Foundation: A strong foundation is essential for a sturdy pergola. If you’re building a freestanding pergola, concrete footings or posts are needed to keep the structure secure.
  • Design Approval: Depending on where you live, you may need to check with your local zoning laws or HOA guidelines to ensure that your pergola meets certain requirements.
  • Professional Help: For complex designs or large structures, hiring a professional contractor with experience in custom pergola design is recommended.

Once your pergola is installed, the maintenance typically involves occasional cleaning, staining or sealing wooden structures, and inspecting for damage. Metal pergolas may need periodic touch-ups to prevent rust, while retractable canopies should be cleaned and stored during harsh weather conditions.

A custom-built pergola is an excellent way to elevate your outdoor living space, offering a combination of shade, style, and functionality. Whether you choose a wooden or metal structure, add retractable features, or personalize it with lighting and seating, a custom pergola can become the centerpiece of your backyard. By carefully selecting the materials, design, and features that best suit your space, you can create a beautiful outdoor retreat that enhances your home’s curb appeal and provides a perfect spot to entertain, relax, or simply enjoy the outdoors. With thoughtful design and proper installation, your custom-built pergola will provide years of enjoyment and timeless beauty to your outdoor space.

DIY Pallet Shelving: Create Rustic and Functional Shelves

Source:https://loveincorporated.blob.core.windows.net

In recent years, DIY pallet shelving has become a popular choice for homeowners and interior designers looking to add a rustic, charming touch to their homes. Whether you’re outfitting your living room, kitchen, or even a home office, pallet shelves offer a unique, eco-friendly way to store and display your items while embracing a natural, industrial aesthetic. These shelves are not only practical but also a cost-effective way to create custom storage solutions for your home. In this article, we’ll explore how to create your own pallet shelves, the tools and materials you’ll need, and some creative design ideas to inspire your next DIY project.

The Appeal of DIY Pallet Shelving

Pallet shelves are the perfect blend of function and style. Using wooden pallets, which are often found at local hardware stores, warehouses, or even through online marketplaces, you can build shelving units that range from simple, single-tier designs to complex, multi-tiered creations. The natural wood finish of pallets gives a rustic vibe that works in almost any interior—from modern minimalist spaces to cozy cottage-inspired homes.

One of the major benefits of DIY pallet shelving is its affordability. Pallets are often free or available at a low cost, making them a budget-friendly alternative to purchasing pre-made shelves. Furthermore, building your own pallet shelves allows you to customize the design to your exact specifications, whether you’re creating a small set of floating shelves for your kitchen or a large, freestanding bookshelf for your living room.

The process of working with pallets is straightforward and provides a satisfying sense of accomplishment once the project is complete. Even beginners can dive into pallet shelving projects, and with a little creativity and elbow grease, you can create a piece of furniture that’s both beautiful and functional.

Essential Materials and Tools for DIY Pallet Shelving

Before you start building your pallet shelves, it’s important to gather the necessary materials and tools. While the list may vary depending on the complexity of your design, here’s a basic overview of what you’ll need:

Materials:

  • Pallets – Choose pallets that are in good condition with sturdy boards. You can often find free or inexpensive pallets at local retailers, home improvement stores, or online.
  • Wood screws – These will be used to attach the pallet shelves to the wall or to secure multiple pallet units together.
  • Wood finish or paint – You’ll want to seal your pallet shelves to protect the wood and enhance its appearance. You can use a wood stain, clear polyurethane, or even paint it a color that matches your home’s décor.
  • Brackets or wall anchors (if attaching shelves to a wall) – These will ensure your pallet shelves are securely mounted.
  • Sandpaper – To smooth rough edges and ensure the surface is safe to handle.
  • Wood glue (optional) – Can be used for additional stability if needed.

Tools:

  • Screwdriver or drill – To drive screws into the wood.
  • Saw (if resizing pallets) – If you need to cut the pallets down to a smaller size, a saw will be necessary. You can use a circular saw, jigsaw, or handsaw.
  • Measuring tape – To ensure your shelves fit perfectly in the space you have.
  • Level – To ensure that your shelves are mounted evenly.
  • Hammer – If you need to tap in nails or secure parts of the pallet.

With these materials and tools, you’ll be well-equipped to create your very own pallet shelving unit. The next step is to dive into the design process.

Step-by-Step Guide to Building DIY Pallet Shelves

Now that you have the materials ready, let’s walk through the process of creating DIY pallet shelving. Follow these simple steps to build functional, rustic shelves for your space.

1. Select and Prepare the Pallets

Start by selecting pallets that are in good condition. They should be free from damage, splinters, or broken slats. Once you’ve chosen your pallets, you may want to clean them by wiping off any dirt or debris. If the pallets are stained, painted, or have rough spots, sand them down to achieve a smooth finish.

If you plan to resize the pallets, use a saw to trim them down to your desired dimensions. You can cut them lengthwise or adjust the height to create shelves that fit perfectly in your space.

2. Assemble the Shelves

Once your pallets are prepared, it’s time to assemble the shelves. You can use the entire pallet as a single shelf unit or break it down into smaller sections for individual shelves. If you want a more modular look, cut the pallet into two or three smaller pieces.

To assemble the shelves:

  • Position the slats in a horizontal orientation if you want the shelf to be wider and sturdier.
  • Use screws to secure the slats together, or add additional wood pieces if necessary for more stability.

3. Sand and Finish the Wood

Once your pallet structure is assembled, take time to sand down the edges and surface to remove rough spots. If the pallet’s surface has nails or splinters, ensure they are hammered in or removed for safety reasons.

After sanding, you can choose to leave the wood in its natural, rustic state, or apply a stain or paint for a more polished look. Applying a protective wood finish or clear coat will also help preserve the integrity of the pallet and keep it looking great for years.

4. Mount the Shelves

If you’re installing your pallet shelves on the wall, you will need to mount them securely. Use a level to ensure the shelf is aligned correctly, then mark where the screws or wall anchors will go.

For heavy-duty shelves, it’s important to mount them into the studs in the wall, using wall anchors if the studs aren’t in the desired location. Use brackets for added support, and ensure the screws are tightly fastened for stability.

For freestanding pallet shelves, simply position the shelf against the wall and add a few decorative brackets or legs if desired for extra support and style.

5. Add Your Finishing Touches

Once your DIY pallet shelving is mounted and secured, it’s time to personalize the shelves with your favorite items. You can use the shelves to display books, plants, candles, or decorative objects. Pallet shelves are great for showcasing personal collections or even serving as a storage solution for bathroom essentials, kitchen spices, or office supplies.

Creative Ideas for Styling DIY Pallet Shelving

Here are a few creative ways to style your pallet shelves to make them unique and functional in your home:

1. Rustic Kitchen Shelves

In the kitchen, DIY pallet shelving can be used to store spices, dishes, or even hanging utensils. Mount a pallet shelf above your counter for easy access to items, or use smaller pallet shelves along the wall to display potted herbs and decorative kitchenware.

2. Floating Bookshelves

In the living room or bedroom, pallet shelves can be used to create a floating bookshelf. Stack several pallets vertically to create a custom shelving unit for your books, artwork, or small décor items.

3. Bathroom Storage

Use smaller pallet shelves in your bathroom for organizing towels, toiletries, or decorative jars. You can mount them on the wall above the sink or next to the shower for extra storage.

4. Entryway Organizer

Create a rustic entryway storage solution by using pallet shelves for shoes, hats, keys, and mail. This design works well for smaller spaces and adds a welcoming touch to your foyer.

Incorporating DIY pallet shelving into your home is an excellent way to create custom storage that combines style and function. Whether you want to add rustic charm to your living room, kitchen, or bathroom, pallet shelves offer a versatile and budget-friendly solution. By following simple steps to assemble, sand, and mount your pallet shelves, you can easily create a beautiful and practical storage option that enhances your home’s décor. With your own personal touch, these shelves will not only serve as functional storage but also as a statement piece in your home.

Posted in DIY

Rustic Bathroom Lighting: Warm and Inviting Lighting for Your Bathroom

Source:https://cdn.decorilla.com

When designing a bathroom, lighting plays a crucial role in both its functionality and aesthetic appeal. The right lighting not only enhances the ambiance but also contributes to the overall atmosphere of relaxation and comfort. Rustic bathroom lighting is a popular design choice for homeowners looking to create a warm, inviting, and cozy environment in their bathrooms. Inspired by the charm of countryside living and nature, rustic bathroom lighting adds a touch of warmth and character to your space while offering practical illumination. In this article, we will explore how to incorporate rustic lighting into your bathroom design, the types of lighting to consider, and tips on how to balance style and function for the perfect bathroom retreat.

The Appeal of Rustic Bathroom Lighting

Rustic bathroom lighting brings the beauty of natural materials, earthy tones, and timeless design elements into your home. It creates an intimate, cozy atmosphere reminiscent of a country retreat or a cabin in the woods. Whether you live in a rural home or a modern apartment, rustic lighting can evoke a sense of tranquility and warmth that transforms your bathroom into a spa-like sanctuary.

The charm of rustic bathroom lighting lies in its ability to blend various design influences, from vintage farmhouse styles to industrial accents. These fixtures often incorporate materials like wood, metal, wrought iron, and even glass to create lighting options that are both functional and visually appealing. With the right fixtures, rustic bathroom lighting can highlight the unique features of your space, add warmth to neutral tones, and offer a sense of comfort that enhances your bathroom’s overall design.

Key Features of Rustic Bathroom Lighting

When choosing rustic lighting for your bathroom, it’s important to consider the elements that will give the space a warm, welcoming feel while also meeting your lighting needs. Below are some key features and characteristics of rustic bathroom lighting that can transform your bathroom into a cozy, stylish retreat.

1. Natural Materials

One of the most prominent features of rustic bathroom lighting is the use of natural materials such as wood, stone, and metal. These materials often evoke a sense of nature and the outdoors, creating a more grounded and inviting atmosphere. Wood fixtures or wooden shades, for example, can add an organic element to your bathroom’s lighting, while metal components, such as oil-rubbed bronze or wrought iron, can create an industrial yet earthy feel.

Lighting fixtures that incorporate distressed wood or reclaimed barn wood are a particularly popular choice in rustic bathroom designs. These materials bring a sense of history and character to the space while maintaining a modern edge that works well with a variety of design styles.

2. Soft, Ambient Lighting

Rustic bathroom lighting often focuses on creating a warm, soft glow rather than harsh, direct lighting. This helps create a soothing atmosphere that is ideal for relaxation. Ambient lighting, often in the form of pendant lights, chandeliers, or sconces, can provide even illumination throughout the bathroom, making it feel cozy and inviting.

Soft, diffused lighting also helps reduce shadows, ensuring that your bathroom is well-lit without being overwhelming. Consider using frosted glass or fabric shades for light fixtures, which will soften the light and add to the warm ambiance.

3. Vintage and Industrial Influences

Rustic bathroom lighting frequently combines vintage and industrial influences, offering a mix of old-world charm and modern sensibilities. For instance, light fixtures that resemble old lanterns, mason jar sconces, or Edison bulb designs can evoke a nostalgic feel while still delivering contemporary functionality. These fixtures work particularly well in bathrooms that feature exposed brick, wood accents, or stone features.

Exposed bulb fixtures, such as Edison-style bulbs or cage-style light sconces, have become synonymous with rustic bathroom lighting. These bulbs create a vintage vibe while also providing ample light, making them a practical option for spaces that need both style and substance.

Types of Rustic Bathroom Lighting Fixtures

When incorporating rustic bathroom lighting, it’s important to choose fixtures that not only complement the overall design but also serve the functional needs of the space. Here are some of the most popular rustic lighting options for the bathroom:

1. Rustic Vanity Lights

Vanity lights are essential in a bathroom for tasks like grooming, shaving, or applying makeup. Rustic vanity lights typically come in two styles: a single light fixture or a multi-light bar. The key to achieving a rustic look is choosing fixtures made from natural materials, such as a wooden or metal base, and opting for warm, muted tones.

Fixtures with glass shades, frosted glass, or even mason jars are perfect for adding rustic charm to your vanity area. If your bathroom has a farmhouse or vintage aesthetic, consider using vanity lights that incorporate the look of old-fashioned candleholders or lanterns.

2. Rustic Chandeliers

For larger bathrooms or those with high ceilings, a rustic chandelier can add an elegant yet charming focal point to your space. Whether you opt for a grand, multi-arm design or a more subtle, small-scale chandelier, these light fixtures provide both ambient lighting and visual interest.

Rustic chandeliers are often made from wrought iron, wood, or a combination of both. The design typically features exposed bulbs, adding to the vintage appeal, and can be a beautiful addition to a bathroom that embraces the rustic, country-chic look.

3. Wall Sconces

Rustic wall sconces are another fantastic way to introduce warmth and style into your bathroom lighting. Whether you use them on either side of the mirror, above the vanity, or as accent lighting on the walls, sconces offer a beautiful way to provide soft, ambient lighting.

Wall sconces in rustic bathrooms often incorporate features like wooden backplates, iron brackets, and glass or metal shades. The versatility of sconces makes them an excellent choice for bathrooms of any size, whether you need extra light in specific areas or are looking to add subtle decorative touches.

4. Pendant Lights

Pendant lights are a modern touch to rustic bathrooms and can be used above the vanity, in the shower area, or even over the bathtub. With a range of materials to choose from, such as glass, wood, or metal, pendant lights allow you to make a statement while providing focused, task-oriented lighting.

Rustic pendant lights can create a visual focal point and work well in bathrooms that feature a minimalist design. A group of pendant lights hung at varying heights can add dimension and style to your bathroom.

Tips for Perfecting Your Rustic Bathroom Lighting Design

Achieving the perfect balance between style and functionality is key when designing rustic bathroom lighting. Here are a few tips to keep in mind:

1. Layer Your Lighting

For optimal illumination, incorporate a combination of ambient, task, and accent lighting. This ensures that your bathroom is well-lit for various activities while creating a warm, inviting atmosphere. For example, use overhead lighting or a chandelier for ambient light, add sconces or vanity lights for task lighting, and incorporate accent lighting to highlight architectural details or artwork.

2. Use Dimmable Features

Adding dimmable switches to your rustic bathroom lighting allows you to adjust the light levels according to the time of day or the mood you want to create. Whether you’re taking a relaxing bath or getting ready in the morning, having control over the lighting intensity is essential for a comfortable and functional space.

3. Match the Lighting with the Bathroom’s Color Palette

When selecting rustic bathroom lighting, consider how the fixtures will complement the bathroom’s existing color scheme. Neutral tones like soft grays, whites, and browns work well with rustic lighting elements, creating a cohesive, calm environment. Earthy tones and natural finishes, such as matte black, bronze, or copper, are also great options for adding warmth to your bathroom.

Incorporating rustic bathroom lighting into your design can create a warm, inviting, and functional space that evokes the charm of rural living and natural beauty. By using a mix of natural materials, soft ambient lighting, and vintage-inspired fixtures, you can transform your bathroom into a stylish retreat that is both practical and visually appealing. Whether you prefer a vintage farmhouse aesthetic, an industrial look, or a blend of rustic elements, the right lighting can enhance your bathroom’s atmosphere, making it a place of relaxation and comfort. With thoughtful design and attention to detail, your bathroom will not only look beautiful but also feel like a serene sanctuary.

Modern Balcony Designs: Transform Your Balcony into a Stylish Retreat

Source:https://s3.ap-south-1.amazonaws.com

A balcony, often considered a small and overlooked space, has the potential to become one of the most charming areas of your home. With the right approach and some creativity, you can transform your balcony into a stylish retreat that serves as both a peaceful sanctuary and an extension of your indoor living area. Modern balcony designs offer an array of possibilities, from cozy garden escapes to sleek, contemporary lounges. Whether you’re working with a tiny urban balcony or a spacious rooftop terrace, the key to maximizing its potential lies in thoughtful planning and design. In this article, we will explore several tips and ideas for turning your balcony into an elegant and functional space, all while incorporating the latest trends in modern balcony designs.

Why Invest in Modern Balcony Designs?

Balconies, though often smaller in size compared to other parts of the home, have become increasingly important as outdoor living areas. With more people spending time at home, particularly in urban environments, creating a private outdoor retreat has become a top priority. Modern balcony designs are no longer limited to simple railings and small chairs. They now incorporate a variety of materials, layouts, and features that blend form and function.

Investing in a stylish balcony can have a profound impact on your lifestyle. It not only adds value to your home but also provides a relaxing outdoor area where you can unwind, entertain guests, or enjoy fresh air. With the right design elements, your balcony can be a seamless extension of your home’s interior design, providing an additional “room” to enjoy year-round.

The Core Elements of Modern Balcony Designs

When designing a modern balcony, several core elements contribute to its style, comfort, and functionality. From the furniture you choose to the materials you incorporate, every decision plays a role in creating a cohesive and inviting outdoor space. Here are some key design components to consider:

1. Furniture and Layout

The furniture you select for your balcony is critical in creating a functional and comfortable space. Modern balcony designs often prioritize minimalist furniture that doesn’t overpower the space but offers plenty of seating and functionality. Modular seating, stackable chairs, and foldable tables are ideal for smaller balconies, as they can be easily rearranged or stored when not in use.

For larger balconies, consider incorporating a sectional sofa, a hammock chair, or a small dining table for outdoor meals. You can also mix and match different types of seating to create a more dynamic layout. Keep in mind that comfort is just as important as style, so opt for furniture that is not only visually appealing but also practical and comfortable for extended use.

2. Flooring

The right flooring can elevate the aesthetic of your balcony and provide a clean, comfortable surface underfoot. Many modern balcony designs use outdoor rugs, deck tiles, or composite decking to create a stylish and functional floor. Deck tiles, made from wood, rubber, or PVC, are particularly popular for balconies because they are easy to install, durable, and weather-resistant.

For a more luxurious look, consider outdoor carpeting or rugs that complement your furniture. These can add a touch of softness and warmth to your space, making it feel more like an indoor room. Be sure to choose materials that can withstand outdoor conditions and are easy to clean.

3. Greenery and Planting

Plants are an essential element in modern balcony designs. Whether you’re working with a small balcony or a larger terrace, introducing greenery can instantly transform the space into a natural oasis. Vertical gardens, potted plants, and hanging planters are excellent options for maximizing limited space. If you have room for larger containers, consider growing small trees or shrubs to create a more lush, private environment.

Herbs, succulents, and flowering plants are not only visually appealing but can also add fragrance and texture to your balcony. When designing your space, choose plants that are suited for your climate and growing conditions, and arrange them in a way that enhances the overall aesthetic of the space.

4. Lighting

Lighting plays a crucial role in setting the mood and enhancing the ambiance of your balcony. Modern balcony designs often incorporate sleek, contemporary lighting fixtures that highlight the beauty of the space. String lights, LED spotlights, or even lantern-style sconces can add a warm, inviting glow to your outdoor retreat.

For a more dramatic effect, consider installing lighting along the railing or under the furniture. Solar-powered garden lights or battery-operated lanterns are also great options for creating a cozy and eco-friendly atmosphere. Additionally, consider using dimmable lighting or lights with adjustable colors to suit different moods or times of day.

5. Privacy Solutions

One of the challenges of many urban balconies is the lack of privacy. However, modern balcony designs offer several ways to make your outdoor space feel more secluded and intimate. Privacy screens, trellises, or outdoor curtains can create a sense of enclosure without obstructing your view. Bamboo screens or slatted wood panels are excellent choices for adding both privacy and style.

Another option is to grow climbing plants like ivy, jasmine, or climbing roses, which will naturally provide coverage and privacy. These plants also bring additional beauty to the space, giving it a more natural, garden-like feel.

6. Color Scheme and Accents

The color palette you choose for your balcony should complement both your home’s interior design and the outdoor environment. Neutral colors like white, gray, or beige are often used in modern balcony designs for their clean, sophisticated look. You can then introduce pops of color through accessories such as cushions, throw blankets, or decorative pillows.

For a more striking design, consider using bolder colors like deep blues, earthy tones, or even metallic accents. Be mindful of balancing color with natural elements like wood or stone, which can help create a calming, cohesive look.

Ideas for Maximizing Your Balcony’s Potential

Even small balconies can become stylish retreats with the right design choices. Here are some ideas for making the most of your balcony space:

1. Compact Outdoor Lounge

For a small balcony, a compact outdoor lounge with a small bistro table and two chairs is an ideal setup. Add a few throw pillows and a cozy outdoor rug to enhance the comfort and style. This creates an intimate spot for morning coffee or evening cocktails while maintaining a clean, uncluttered look.

2. Rooftop Garden

If you’re lucky enough to have a larger rooftop space, consider creating a rooftop garden with a combination of modern furniture, a small dining area, and a selection of plants. This type of design can become an oasis in the city, offering a space for outdoor dining, entertaining, or simply enjoying the view.

3. Modern Zen Balcony

A Zen-inspired balcony can become a peaceful retreat with minimal furniture, soft lighting, and calming plants. Use bamboo or wooden decking, and incorporate a few meditation cushions or low seating for a serene atmosphere. A small water feature, such as a fountain, can add a tranquil sound to complete the Zen experience.

4. Balcony Bar

For those who love to entertain, a modern balcony bar could be the perfect addition. Install a small bar counter along one side of the balcony, with stools for seating. Complement this setup with stylish lighting and decorative accents to create a sophisticated, outdoor entertaining area.

Transforming your balcony into a stylish retreat is easier than you might think, thanks to the many innovative ideas and design elements available in modern balcony designs. From selecting the right furniture and plants to incorporating smart lighting and privacy solutions, the possibilities for creating an inviting, functional outdoor space are endless. Whether you’re working with a small urban balcony or a spacious rooftop, applying these design principles can help you maximize your space and enjoy an outdoor oasis right at home. With thoughtful planning and a touch of creativity, your balcony can become the perfect place to unwind, entertain, and soak in the outdoors.

Outdoor Water-Saving Tips: Create a Beautiful Yard While Conserving Water

Source:https://www.sjwater.com

Water conservation is increasingly becoming a priority for homeowners, particularly in areas where water shortages or droughts are a concern. While maintaining a lush, green lawn and vibrant garden may seem like a water-intensive task, there are many effective ways to conserve water in your outdoor spaces without sacrificing beauty or functionality. By applying a few simple outdoor water-saving tips, you can create a stunning yard while using less water, helping both the environment and your water bill. In this article, we’ll explore a range of strategies to reduce water consumption in your outdoor areas, including smart irrigation practices, plant choices, and maintenance techniques.

The Importance of Water Conservation in the Garden

Water is a precious resource, and with increasing pressure on global water supplies, it is essential that we use it wisely. Lawns, gardens, and other outdoor spaces are often significant consumers of water, especially during the hot summer months. However, reducing water usage doesn’t mean you need to sacrifice the aesthetic appeal of your yard. With the right techniques, you can create a beautiful, healthy outdoor space that thrives without wasting water.

One of the primary areas where homeowners can make an impact is through the efficient use of irrigation. By following outdoor water-saving tips, such as adjusting watering schedules, using water-efficient systems, and choosing the right plants for your climate, you can create a vibrant garden that minimizes water waste and conserves valuable resources.

Outdoor Water-Saving Tips for a Thriving Yard

Whether you’re looking to update your landscaping, reduce your water bill, or help the environment, these outdoor water-saving tips will guide you in creating an eco-friendly garden that’s both beautiful and functional.

1. Choose Water-Efficient Plants

One of the best ways to conserve water in your garden is by selecting plants that are native to your area or drought-tolerant species. Native plants are well-adapted to local climates and require significantly less water, fertilizer, and maintenance than non-native varieties. Drought-resistant plants, such as succulents, lavender, or ornamental grasses, are designed to withstand dry conditions and can thrive with minimal water.

In addition to selecting the right plants, consider grouping them according to their water needs. By planting species with similar water requirements together, you can optimize watering and ensure that each plant receives the appropriate amount of moisture without over-watering some while under-watering others.

2. Install Drip Irrigation Systems

Traditional sprinkler systems often waste water by spraying large areas, including walkways, driveways, and sidewalks. Drip irrigation systems, on the other hand, target the roots of plants directly, delivering water precisely where it’s needed. These systems use less water and can be more efficient than traditional sprinklers, reducing evaporation and runoff.

Drip irrigation is ideal for flower beds, vegetable gardens, shrubs, and trees, as it allows water to soak directly into the soil. Additionally, some modern drip irrigation systems include timers, which can be programmed to water your garden during the cooler parts of the day, further reducing water loss due to evaporation.

3. Water Your Garden at the Right Time

The timing of your watering can significantly impact water efficiency. Watering in the early morning or late evening, when temperatures are cooler, allows the water to soak into the soil before the sun evaporates it. Avoid watering during the middle of the day, when the heat of the sun can cause most of the water to evaporate before it reaches the plant roots.

Additionally, pay attention to weather conditions. During rainy periods, you can skip watering altogether. Many irrigation systems have rain sensors that automatically turn off the sprinklers when it’s raining, ensuring that water is only used when it’s needed.

4. Use Mulch to Retain Moisture

Mulch is an excellent way to conserve water in your garden. By covering the soil around your plants with a layer of organic mulch, such as wood chips, straw, or compost, you help retain moisture and reduce the need for frequent watering. Mulch acts as an insulating layer, preventing evaporation and keeping the soil cooler in hot weather. It also helps suppress weed growth, which can compete with your plants for water and nutrients.

As mulch decomposes, it also enriches the soil, providing valuable nutrients to your plants. Be sure to apply mulch to a depth of 2-3 inches to achieve the best results.

5. Optimize Your Lawn Care Routine

Lawns are one of the biggest water consumers in many homes, but there are several ways to reduce water usage without compromising the health of your grass. First, consider adjusting your lawn mowing habits. Keeping your lawn at a slightly taller height—around 3 inches—helps shade the roots and retain moisture in the soil. A longer lawn also promotes deeper root growth, which can make the grass more drought-resistant.

Additionally, water your lawn less frequently but more deeply. This encourages the roots to grow deeper into the soil, making the grass more drought-tolerant. Aim to water your lawn once or twice a week, depending on rainfall, rather than daily. A deep watering session that reaches the root zone is much more effective than light, frequent watering.

6. Consider Hardscape Elements

Incorporating hardscaping elements, such as patios, walkways, and stone features, can reduce the amount of land that requires regular watering. These features not only add visual appeal to your yard but can also serve as practical, low-maintenance alternatives to traditional plantings. Hardscaping reduces the need for grass or flower beds in areas that might otherwise require frequent watering.

Consider using permeable materials, such as gravel, pavers, or porous concrete, for pathways and patios. These materials allow water to flow through them and into the ground, promoting natural water absorption and reducing runoff.

7. Harvest Rainwater

Collecting rainwater is a simple and effective way to reduce your reliance on municipal water for irrigation. Install rain barrels or other collection systems to capture rainwater from your roof, which can then be used to water your garden, trees, or lawn. This water is free and natural, and using it helps conserve precious potable water for other household needs.

Rainwater harvesting systems are easy to set up, and there are many options available, from simple barrels to more elaborate systems that filter and store rainwater for long-term use. Be sure to place your rain barrels in a location where they can collect water easily, such as under downspouts or gutters.

By implementing outdoor water-saving tips, you can create a beautiful, thriving yard while doing your part to conserve water. From choosing drought-resistant plants to installing efficient irrigation systems and using mulch to retain moisture, there are countless ways to reduce water usage without sacrificing the beauty or functionality of your outdoor space. By making a few thoughtful adjustments to your gardening and landscaping habits, you can enjoy a lush, vibrant yard while contributing to water conservation efforts and reducing your environmental impact.

Modern Patio Furniture: Stylish Seating for Your Outdoor Space

Source:https://www.marthastewart.com

As outdoor living spaces become an extension of our homes, the demand for stylish, comfortable, and functional patio furniture has skyrocketed. Whether you’re looking to create a serene backyard retreat or a lively area for entertaining, modern patio furniture can elevate your outdoor space, offering both aesthetic appeal and practical comfort. From sleek, minimalist designs to bold, contemporary styles, the right furniture can transform your patio into a stylish oasis. In this article, we will explore the benefits of modern patio furniture, the key elements to consider when choosing the perfect pieces, and how to maintain these outdoor furnishings for long-lasting beauty and durability.

The Appeal of Modern Patio Furniture

Patio furniture has come a long way from the traditional wicker chairs and bulky wooden tables of the past. Today’s modern patio furniture features clean lines, innovative materials, and versatile designs that cater to a wide range of outdoor spaces and preferences. Whether you have a small balcony, a sprawling garden, or a rooftop terrace, modern outdoor furniture provides a chic and sophisticated solution for maximizing your space and enhancing its functionality.

The appeal of modern patio furniture lies in its ability to blend style and practicality. Unlike older styles that often prioritize aesthetics over comfort, contemporary outdoor furniture is designed to provide a relaxing experience without sacrificing the look of the space. Moreover, modern patio furniture often includes materials that are weather-resistant, durable, and easy to maintain, ensuring that your outdoor furniture stands up to the elements and continues to look great for years to come.

Benefits of Modern Patio Furniture

Modern patio furniture offers numerous advantages over traditional outdoor furnishings. Here are some of the key benefits that make it an attractive choice for homeowners looking to upgrade their outdoor spaces:

1. Durability and Weather Resistance

Many modern patio furniture pieces are constructed with advanced materials designed to withstand the elements. For example, powder-coated aluminum, synthetic wicker, and weather-resistant fabrics are commonly used to ensure that the furniture remains intact and looking fresh, even after exposure to rain, sun, or humidity. This means you can enjoy your furniture year-round without worrying about rust, fading, or wear and tear.

2. Comfort and Versatility

Comfort is a key consideration when selecting patio furniture, and modern designs have perfected the art of blending style with support. Many modern pieces are equipped with thick cushions, adjustable features, and ergonomic designs that make lounging and entertaining much more enjoyable. Additionally, modern patio furniture is highly versatile, allowing you to mix and match different seating options, tables, and accessories to create a layout that suits your lifestyle.

3. Minimal Maintenance

Unlike traditional wooden furniture that may require regular staining, sealing, or oiling, modern patio furniture made from materials like aluminum, teak, or resin wicker generally requires minimal upkeep. Most of these materials are designed to be easy to clean, stain-resistant, and UV-protected, which means you can spend more time enjoying your outdoor space and less time on maintenance.

4. Sleek Aesthetic

The clean lines, geometric shapes, and sleek designs of modern patio furniture make it an ideal choice for homeowners who prefer a minimalist or contemporary look. With options available in a variety of colors, textures, and finishes, modern furniture can complement a range of exterior design styles, from urban lofts to coastal retreats. Whether you opt for a simple lounge chair or a full sectional sofa set, the design elements of modern outdoor furniture will instantly elevate the aesthetic of your patio, deck, or garden.

Key Elements to Consider When Choosing Modern Patio Furniture

When shopping for modern patio furniture, it’s important to think about both your design preferences and the specific needs of your outdoor space. Consider factors such as size, functionality, comfort, and material durability. Here are some key elements to keep in mind when selecting patio furniture for your outdoor area:

1. Size and Layout

Before making any purchases, measure the dimensions of your patio or balcony to ensure that the furniture fits comfortably without overcrowding the space. For smaller patios or balconies, opt for space-saving furniture like stackable chairs, foldable tables, or modular seating that can be rearranged as needed. Larger outdoor spaces can accommodate larger seating arrangements, such as sectional sofas, dining sets, and lounge chairs.

2. Material Selection

Choosing the right material for your patio furniture is crucial for durability and comfort. Common materials for modern patio furniture include:

  • Aluminum: Known for being lightweight, rust-resistant, and durable, aluminum is a popular choice for modern outdoor furniture. It is available in a variety of styles, including sleek, minimalist designs, and can withstand extreme weather conditions.
  • Teak: Teak is a high-quality hardwood known for its natural beauty and resistance to moisture, making it a great choice for outdoor use. It ages well, developing a silver-gray patina over time, or it can be maintained with oil to preserve its rich golden tone.
  • Resin Wicker: This synthetic material mimics the look of traditional wicker but is far more durable and weather-resistant. It’s ideal for outdoor use as it resists fading, cracking, and mold growth, even when exposed to the elements.
  • Stainless Steel: For a sleek, industrial look, stainless steel furniture provides a modern touch while offering strength and durability. It’s easy to clean and resistant to rust and corrosion, making it a great option for outdoor spaces near the coast.
  • Fabric: Outdoor cushions and upholstery are available in fabrics that are fade-resistant, water-repellent, and easy to clean. Sunbrella fabric, for example, is a popular choice for modern patio cushions due to its durability and resistance to UV rays.

3. Comfort and Cushioning

The comfort of your patio furniture is just as important as its style. Look for pieces with plush cushions and ergonomic designs that offer support for long hours of sitting or lounging. Many modern outdoor furniture sets come with removable, machine-washable cushions, which makes it easy to clean them after a long season of use. Additionally, consider cushions made with high-density foam or memory foam for added comfort.

4. Functionality and Flexibility

Many modern patio furniture pieces are designed with functionality in mind. For example, modular furniture allows you to create a customized seating arrangement that can be adjusted to suit your needs. Folding tables, adjustable chairs, and storage benches offer convenience, allowing you to maximize space and accommodate a variety of activities, from dining to lounging to entertaining.

Styling Your Outdoor Space with Modern Patio Furniture

Once you’ve selected your modern patio furniture, it’s time to think about how to arrange and style your outdoor area. Consider your lifestyle and how you want to use the space:

  • Relaxation Zone: If your goal is to create a tranquil retreat, opt for deep-seating lounge chairs, a cozy sectional, and a small coffee table. Add a few outdoor rugs, throw pillows, and some greenery for a relaxing vibe.
  • Entertaining Area: For those who love hosting outdoor gatherings, a spacious dining table with matching chairs or a sectional sofa with a coffee table might be ideal. Add lighting, such as string lights or lanterns, and keep the space flexible to accommodate guests.
  • Small Space Solutions: If you’re working with a small patio or balcony, opt for bistro-style furniture, such as a small table and two chairs, or a compact loveseat with a side table. Vertical planters or wall-mounted shelves can help make the most of the space.

Incorporating modern patio furniture into your outdoor space can make a significant difference in both functionality and aesthetics. Whether you are looking to create a relaxing retreat, an entertaining hub, or simply a space to enjoy nature, modern outdoor furniture provides the perfect balance of style, comfort, and durability. With the right selection of materials, pieces, and design elements, you can transform your patio into a stunning and functional extension of your home. Invest in high-quality, weather-resistant furniture that reflects your personal style, and enjoy your outdoor living space for years to come.