Orb of Light: Creating a DIY Chandelier Masterpiece

Source : https://stylecaster.com

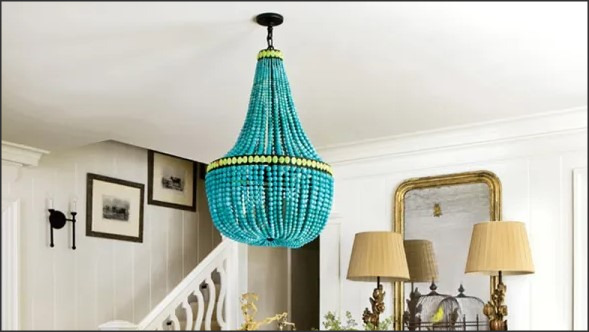
Orb of Light is a unique and creative way to create a stunning DIY chandelier masterpiece. With a few simple materials and a bit of imagination, you can create a beautiful and unique lighting fixture that will be the envy of your friends and family. This guide will provide you with step-by-step instructions on how to create your own Orb of Light chandelier. With a few simple tools and materials, you can create a beautiful and unique lighting fixture that will be the perfect addition to any room. So, let’s get started and create your own Orb of Light chandelier masterpiece!

How to Make a DIY Orb Chandelier: A Step-by-Step Guide

Creating a DIY orb chandelier is a great way to add a unique and stylish touch to any room. This step-by-step guide will walk you through the process of making your own orb chandelier.

Materials Needed:

-Wooden dowels

-Wood glue

-Paint

-Paintbrush

-Drill

-Screws

-Light kit

-Wire cutters

-Wire strippers

-Wire nuts

-Light bulbs

Step 1: Cut the Dowels. Cut the wooden dowels into pieces that are the same length. The number of pieces you need will depend on the size of the chandelier you want to make.

Step 2: Glue the Dowels Together. Use wood glue to attach the pieces of dowel together in a circular shape. Make sure the pieces are tightly secured together.

Step 3: Paint the Dowels. Once the glue has dried, paint the dowels with the color of your choice. Allow the paint to dry completely before moving on to the next step.

Step 4: Drill Holes. Use a drill to make holes in the dowels for the screws. Make sure the holes are evenly spaced and large enough for the screws to fit through.

Step 5: Attach the Light Kit. Use the screws to attach the light kit to the dowels. Make sure the screws are securely fastened.

Step 6: Wire the Light Kit. Use wire cutters and wire strippers to strip the ends of the wires. Connect the wires to the light kit using wire nuts.

Step 7: Install the Light Bulbs. Install the light bulbs in the light kit. Make sure the bulbs are securely fastened.

Step 8: Hang the Chandelier. Hang the chandelier from the ceiling using the appropriate hardware. Make sure the chandelier is securely fastened.

Your DIY orb chandelier is now complete! Enjoy your unique and stylish addition to your home.

Crafting a Unique Chandelier with Orb of Light: Tips and Tricks for a Professional Look

Creating a unique chandelier with an Orb of Light can be a daunting task for even the most experienced DIYer. However, with the right tips and tricks, you can create a professional-looking chandelier that will be the envy of your friends and family. Here are some tips and tricks to help you craft a unique chandelier with an Orb of Light.

First, choose the right size of Orb of Light for your chandelier. The size of the Orb of Light should be proportional to the size of the room in which it will be hung. If the Orb of Light is too small, it will not provide enough light to illuminate the room. On the other hand, if it is too large, it will overpower the room.

Second, select the right type of Orb of Light for your chandelier. There are many different types of Orbs of Light available, including LED, halogen, and incandescent. Each type of Orb of Light has its own advantages and disadvantages, so it is important to choose the one that best suits your needs.

Third, choose the right type of mounting hardware for your chandelier. The mounting hardware should be strong enough to support the weight of the Orb of Light and should be able to withstand the vibrations of the chandelier.

Fourth, select the right type of wiring for your chandelier. The wiring should be able to handle the voltage of the Orb of Light and should be able to withstand the vibrations of the chandelier.

Finally, choose the right type of finish for your chandelier. The finish should be able to withstand the elements and should be able to provide a professional look.

By following these tips and tricks, you can create a unique chandelier with an Orb of Light that will be the envy of your friends and family. With the right materials and tools, you can create a professional-looking chandelier that will be the centerpiece of your home.The Orb of Light DIY Chandelier Masterpiece is a great way to add a unique and beautiful touch to any room. It is easy to assemble and customize, and the end result is a stunning and eye-catching piece of art. With its unique design and customizable features, the Orb of Light is sure to be a conversation starter and a great addition to any home.

Pegboard Paradise: Organizational Ideas with Garage Pegboards

Pegboard Paradise: Organizational Ideas with Garage Pegboards is a comprehensive guide to organizing your garage with pegboards. It provides step-by-step instructions on how to install pegboards, as well as ideas for organizing tools, supplies, and other items. It also includes tips on how to maximize the use of pegboards and make the most of your space. Whether you’re a DIYer or a professional, this guide will help you create an organized and efficient garage.

How to Maximize Your Garage Storage with Pegboard Paradise: Creative Ideas for Organizing Your Space

Garage storage can be a challenge, but with the right tools and creative ideas, it can be transformed into a functional and organized space. Pegboard is an ideal solution for maximizing garage storage, as it provides a versatile and customizable way to store items of all shapes and sizes. This article will provide creative ideas for organizing your garage with pegboard, helping you to make the most of your space.

First, consider the layout of your garage and the items you need to store. This will help you determine the size and shape of the pegboard you need. Once you have the pegboard in place, you can begin to customize it to fit your needs. Start by adding hooks and baskets to store items like tools, sports equipment, and gardening supplies. You can also use pegboard to hang bikes, ladders, and other large items.

Next, consider adding shelves and drawers to your pegboard. This will provide additional storage space for items like paint cans, cleaning supplies, and other small items. You can also use pegboard to hang shelves for items like books, magazines, and other items that need to be kept off the floor.

Finally, consider adding accessories to your pegboard. This could include a magnetic strip for holding small tools, a chalkboard for labeling items, or a corkboard for displaying photos and artwork. These accessories can help to make your pegboard more functional and attractive.

By following these creative ideas for organizing your garage with pegboard, you can maximize your storage space and create a functional and organized space. With the right tools and accessories, you can transform your garage into a paradise of storage and organization.

Get Organized in Style: Decorative Pegboard Ideas for Your Garage from Pegboard Paradise

Garages are often the most cluttered and disorganized spaces in a home. To help keep your garage neat and organized, consider using decorative pegboard. Pegboard is a great way to store and organize tools, sports equipment, and other items in an attractive and efficient manner. Pegboard Paradise offers a wide selection of decorative pegboard ideas for your garage that will help you get organized in style.

Pegboard is a great way to maximize storage space in your garage. It is easy to install and can be used to hang items such as tools, sports equipment, and other items. Pegboard is also a great way to add a decorative touch to your garage. Pegboard Paradise offers a variety of decorative pegboard options that can be used to create a unique and stylish look in your garage.

The selection of decorative pegboard from Pegboard Paradise includes a variety of colors, patterns, and textures. You can choose from classic woodgrain, modern metallic, and colorful designs. The pegboard is also available in a variety of sizes to fit any space. With the wide selection of decorative pegboard from Pegboard Paradise, you can easily create a stylish and organized look in your garage.

Pegboard Paradise also offers a variety of accessories to help you get the most out of your decorative pegboard. You can choose from a variety of hooks, baskets, and shelves to help you organize your items. The accessories are designed to fit securely on the pegboard and are available in a variety of colors and styles to match your decorative pegboard.

Decorative pegboard from Pegboard Paradise is a great way to get organized in style. With the wide selection of colors, patterns, and textures, you can easily create a unique and stylish look in your garage. The accessories are designed to fit securely on the pegboard and are available in a variety of colors and styles to match your decorative pegboard. With the help of Pegboard Paradise, you can easily get organized in style and create a beautiful and organized look in your garage.Pegboard Paradise is an excellent resource for anyone looking to get organized and make the most of their garage space. With a variety of pegboard sizes, colors, and accessories, it’s easy to find the perfect solution for any storage need. The website also provides helpful tips and tricks for installation and maintenance, making it a great resource for anyone looking to get organized.

Mirror Magic: DIY Frame Ideas to Enhance Your Space

Mirror Magic: DIY Frame Ideas to Enhance Your Space is a guide to help you create beautiful and unique frames for your mirrors. Whether you’re looking to add a touch of elegance to your bathroom, or you want to create a statement piece for your living room, this guide will provide you with the tools and inspiration you need to create the perfect frame for your mirror. With step-by-step instructions and helpful tips, you’ll be able to create a frame that will add a unique touch to your space. So, let’s get started and explore the world of mirror frames!

Creative Ways to Frame Your Mirror: A Guide to DIY Mirror Magic

Mirrors are a great way to add a touch of style and sophistication to any room. But why settle for a plain, boring mirror when you can create something unique and eye-catching? With a few simple tools and materials, you can transform your mirror into a work of art. This guide will provide you with creative ideas and step-by-step instructions for framing your mirror in a variety of ways.

One of the simplest ways to frame a mirror is to use a picture frame. This is a great option if you want to add a touch of elegance to your mirror without spending a lot of money. All you need is a picture frame that is slightly larger than the mirror, some glue, and a few nails. Start by gluing the frame to the mirror, then use the nails to secure it in place. You can also use decorative molding to create a more elaborate frame.

If you’re looking for something a bit more unique, consider using fabric to frame your mirror. This is a great way to add a pop of color and texture to your space. Start by measuring the mirror and cutting the fabric to size. Then, use a hot glue gun to attach the fabric to the mirror. You can also use ribbon or trim to add a decorative touch.

Another creative way to frame your mirror is to use tiles. This is a great option if you want to add a bit of texture and color to your space. Start by measuring the mirror and cutting the tiles to size. Then, use a strong adhesive to attach the tiles to the mirror. You can also use grout to fill in any gaps between the tiles.

Finally, you can use wood to frame your mirror. This is a great option if you want to add a rustic touch to your space. Start by measuring the mirror and cutting the wood to size. Then, use a strong adhesive to attach the wood to the mirror. You can also use wood stain or paint to give the frame a unique look.

No matter which framing option you choose, you’ll be sure to create a beautiful and unique piece of art. With a little creativity and some basic tools, you can transform your mirror into a work of art.

Transform Your Home with Mirror Magic: Easy DIY Frame Ideas to Enhance Your Space

Mirror magic is a great way to transform any home. Mirrors can be used to create a sense of space, light, and style in any room. With a few simple DIY frame ideas, you can easily enhance your home’s décor and create a unique look.

One of the easiest ways to add a touch of mirror magic to your home is to frame a large mirror. This can be done with a variety of materials, such as wood, metal, or even fabric. You can choose a frame that complements the existing décor in your home, or you can create a unique look by using a contrasting material. For example, if you have a modern home, you could choose a metal frame to add a contemporary touch. If you have a more traditional home, you could choose a wooden frame to add a classic look.

Another great way to use mirrors to transform your home is to create a feature wall. This can be done by using multiple mirrors of different sizes and shapes. You can arrange them in a pattern or simply hang them in a random order. This will create an eye-catching focal point in any room.

If you’re looking for a more subtle way to add mirror magic to your home, you can use smaller mirrors to create a unique look. For example, you could hang several small mirrors in a hallway or entryway to create a stunning visual effect. You could also use small mirrors to create a unique backsplash in your kitchen or bathroom.

Finally, you can use mirrors to create a unique look in any room. For example, you could hang a large mirror above a fireplace to create a dramatic effect. You could also use mirrors to create a unique look in a bedroom or living room.

No matter how you choose to use mirrors to transform your home, these DIY frame ideas will help you create a unique look that will enhance any space. With a few simple materials and a bit of creativity, you can easily create a stunning look that will make your home look and feel like new.Mirror Magic: DIY Frame Ideas to Enhance Your Space is a great resource for anyone looking to add a unique and personal touch to their home. With a variety of frame styles and materials to choose from, you can easily create a one-of-a-kind piece that will add a touch of elegance and style to any room. Whether you’re looking for a simple frame to hang in your hallway or a more elaborate design to hang in your living room, Mirror Magic has the perfect frame for you. With a little creativity and some DIY know-how, you can create a beautiful and unique frame that will be the envy of all your friends.

Tub Transformations: Rust Oleum Tub and Tile Revamps

Tub Transformations: Rust Oleum Tub and Tile Revamps is a revolutionary product that can help you transform your bathroom in no time. This product is designed to help you quickly and easily update the look of your tub and tile without the hassle of a full remodel. With Rust Oleum Tub and Tile Revamps, you can quickly and easily give your bathroom a fresh, new look. This product is easy to use and provides a durable finish that will last for years. With Rust Oleum Tub and Tile Revamps, you can quickly and easily give your bathroom a makeover without breaking the bank.

How to Transform Your Bathroom with Rust Oleum Tub and Tile Revamps

Bathroom remodeling can be a daunting task, but with the help of Rust-Oleum Tub and Tile Revamps, you can easily transform your bathroom in no time. Rust-Oleum Tub and Tile Revamps is a revolutionary product that allows you to refinish your bathtub, shower, sink, and tile surfaces with a durable, long-lasting finish. This product is easy to use and provides a professional-looking finish that will last for years.

To begin, you will need to prepare the surface by cleaning it thoroughly with a mild detergent and water. Once the surface is clean and dry, you can apply the Rust-Oleum Tub and Tile Revamps. This product comes in a variety of colors and finishes, so you can choose the one that best suits your bathroom. Once you have chosen the color and finish, you can apply the product with a brush or roller. Make sure to follow the instructions on the product label for best results.

Once the product is applied, you will need to wait for it to dry. Depending on the temperature and humidity of the room, this can take anywhere from two to four hours. Once the product is dry, you can apply a second coat if desired. After the second coat is dry, you can enjoy your newly transformed bathroom.

Rust-Oleum Tub and Tile Revamps is an easy and affordable way to give your bathroom a fresh, new look. With its durable finish and easy application, you can quickly and easily transform your bathroom in no time.

Creative Ideas for Rust Oleum Tub and Tile Transformations

1. Create a Faux Marble Look: Use Rust-Oleum Tub and Tile Transformations to create a faux marble look in your bathroom. Start by applying a base coat of the product in a light color, such as white or cream. Once the base coat is dry, use a sponge to apply a darker color, such as gray or black, in a swirling pattern. Finish with a top coat of the product for a beautiful, marble-like finish.

2. Create a Two-Tone Look: Use Rust-Oleum Tub and Tile Transformations to create a two-tone look in your bathroom. Start by applying a base coat of the product in a light color, such as white or cream. Once the base coat is dry, use a sponge to apply a darker color, such as gray or black, in a horizontal or vertical pattern. Finish with a top coat of the product for a unique, two-tone look.

3. Create a Metallic Look: Use Rust-Oleum Tub and Tile Transformations to create a metallic look in your bathroom. Start by applying a base coat of the product in a light color, such as white or cream. Once the base coat is dry, use a sponge to apply a metallic color, such as gold or silver, in a swirling pattern. Finish with a top coat of the product for a beautiful, metallic finish.

4. Create a Textured Look: Use Rust-Oleum Tub and Tile Transformations to create a textured look in your bathroom. Start by applying a base coat of the product in a light color, such as white or cream. Once the base coat is dry, use a sponge to apply a darker color, such as gray or black, in a random pattern. Finish with a top coat of the product for a unique, textured look.Tub Transformations: Rust Oleum Tub and Tile Revamps is an excellent product for anyone looking to give their bathroom a quick and easy makeover. It is easy to use, affordable, and provides a long-lasting finish that will make your bathroom look like new. With its wide range of colors and finishes, you can easily customize your bathroom to match your style and taste. Whether you are looking to give your bathroom a fresh new look or just want to spruce it up a bit, Tub Transformations: Rust Oleum Tub and Tile Revamps is the perfect solution.

Pinterest Perfection: DIY Headboard Ideas from Pinterest

Welcome to Pinterest Perfection: DIY Headboard Ideas from Pinterest! If you’re looking for a unique and creative way to spruce up your bedroom, then you’ve come to the right place. Here, we’ll be exploring some of the best DIY headboard ideas from Pinterest that you can easily make yourself. From rustic wood headboards to upholstered headboards, we’ve got you covered. So, grab your tools and get ready to make your own Pinterest-perfect headboard!

10 DIY Headboard Ideas to Transform Your Bedroom from Pinterest

Creating a unique and stylish headboard for your bedroom can be a fun and rewarding DIY project. With a few simple materials and a bit of creativity, you can transform your bedroom into a cozy and inviting space. Here are 10 DIY headboard ideas from Pinterest that can help you get started.

1. Upholstered Headboard: An upholstered headboard is a great way to add texture and color to your bedroom. You can use fabric, foam, and batting to create a custom headboard that fits your style.

2. Pallet Headboard: A pallet headboard is a great way to add a rustic touch to your bedroom. You can use old pallets to create a unique headboard that will add character to your space.

3. Tufted Headboard: A tufted headboard is a classic look that will never go out of style. You can use fabric, foam, and buttons to create a luxurious headboard that will make your bedroom look like a million bucks.

4. Canvas Headboard: A canvas headboard is a great way to add a modern touch to your bedroom. You can use a canvas drop cloth and some paint to create a unique headboard that will make your bedroom look like a work of art.

5. Leather Headboard: A leather headboard is a great way to add a touch of sophistication to your bedroom. You can use leather scraps to create a headboard that will add a luxurious feel to your space.

6. Reclaimed Wood Headboard: A reclaimed wood headboard is a great way to add a rustic touch to your bedroom. You can use old wood to create a unique headboard that will add character to your space.

7. Wallpaper Headboard: A wallpaper headboard is a great way to add a touch of glamour to your bedroom. You can use wallpaper to create a unique headboard that will make your bedroom look like a million bucks.

8. Mirrored Headboard: A mirrored headboard is a great way to add a touch of luxury to your bedroom. You can use mirrors to create a headboard that will make your bedroom look like a palace.

9. Fabric Headboard: A fabric headboard is a great way to add texture and color to your bedroom. You can use fabric to create a custom headboard that fits your style.

10. Painted Headboard: A painted headboard is a great way to add a unique touch to your bedroom. You can use paint to create a headboard that will make your bedroom look like a work of art.

These 10 DIY headboard ideas from Pinterest are sure to help you create a unique and stylish headboard for your bedroom. With a few simple materials and a bit of creativity, you can transform your bedroom into a cozy and inviting space.

How to Create the Perfect Pinterest-Inspired Headboard for Your Bedroom

Creating the perfect Pinterest-inspired headboard for your bedroom can be a fun and creative way to add a unique touch to your space. With a few simple steps, you can create a beautiful and stylish headboard that will be the focal point of your bedroom.

First, decide on the size and shape of your headboard. Measure the width of your bed and the height of the wall behind it to determine the size of the headboard. Consider the overall design of your bedroom and choose a shape that will complement the existing decor.

Next, choose the material for your headboard. Wood is a popular choice, but you can also use fabric, metal, or even wallpaper. Consider the color and texture of the material to ensure it will match the rest of your bedroom.

Once you have chosen the material, you can begin to assemble the headboard. If you are using wood, you will need to cut the pieces to the desired size and shape. If you are using fabric, you will need to measure and cut the fabric to fit the frame. If you are using wallpaper, you will need to measure and cut the wallpaper to fit the frame.

Finally, attach the headboard to the wall. If you are using wood, you will need to use screws and nails to secure the headboard to the wall. If you are using fabric, you will need to use staples or glue to attach the fabric to the frame. If you are using wallpaper, you will need to use wallpaper paste to attach the wallpaper to the frame.

Once the headboard is attached to the wall, you can add any additional decorations or accessories to complete the look. Consider adding a few throw pillows or a blanket to add a cozy touch to your bedroom.

Creating the perfect Pinterest-inspired headboard for your bedroom can be a fun and creative way to add a unique touch to your space. With a few simple steps, you can create a beautiful and stylish headboard that will be the focal point of your bedroom.Pinterest Perfection: DIY Headboard Ideas from Pinterest is a great resource for anyone looking to create a unique and stylish headboard for their bedroom. With a variety of styles and materials to choose from, there is something for everyone. Whether you are looking for a modern, rustic, or vintage look, you can find the perfect headboard to fit your style. With the help of Pinterest, you can easily create a beautiful and unique headboard that will be the perfect addition to your bedroom.

Stone Stories: Understanding Eldorado Stone Pricing

Stone Stories: Understanding Eldorado Stone Pricing is an invaluable resource for anyone looking to purchase Eldorado Stone products. This comprehensive guide provides an in-depth look at the pricing of Eldorado Stone products, including the various factors that influence the cost of the product. It also provides helpful tips and advice on how to get the best deal when purchasing Eldorado Stone products. With this guide, you can make an informed decision when it comes to selecting the right product for your project.

How to Calculate the Cost of Eldorado Stone for Your Home Improvement Project

Calculating the cost of Eldorado Stone for a home improvement project can be a complex process. The cost of Eldorado Stone depends on a variety of factors, including the type of stone, the size of the project, and the installation method. To accurately calculate the cost of Eldorado Stone for a home improvement project, it is important to consider all of these factors.

First, determine the type of Eldorado Stone that is needed for the project. Eldorado Stone offers a variety of stone products, including natural stone, manufactured stone, and thin stone veneer. Each type of stone has a different cost associated with it. Natural stone is typically the most expensive option, while manufactured stone and thin stone veneer are more affordable.

Next, measure the area where the stone will be installed. This will help determine the amount of stone needed for the project. The cost of Eldorado Stone is based on the square footage of the project.

Finally, consider the installation method. Eldorado Stone can be installed in a variety of ways, including dry stack, mortar, and adhesive. Each installation method has a different cost associated with it. It is important to research the different installation methods and determine which one is best for the project.

By considering all of these factors, it is possible to accurately calculate the cost of Eldorado Stone for a home improvement project. It is important to research the different types of stone, measure the area where the stone will be installed, and consider the installation method in order to get an accurate estimate of the cost.

Exploring the Different Types of Eldorado Stone and Their Prices

Eldorado Stone is a leading manufacturer of manufactured stone veneer, offering a wide variety of products for both interior and exterior applications. With a variety of textures, colors, and styles, Eldorado Stone provides a unique and beautiful look to any home or commercial building. In this article, we will explore the different types of Eldorado Stone and their associated prices.

Eldorado Stone offers a variety of products, including natural stone veneer, thin brick veneer, and architectural stone veneer. Natural stone veneer is a lightweight, easy-to-install product that is made from real stone. It is available in a variety of colors and textures, and is perfect for creating a unique look for any home or commercial building. Thin brick veneer is a lightweight, easy-to-install product that is made from real brick. It is available in a variety of colors and textures, and is perfect for creating a classic look for any home or commercial building. Architectural stone veneer is a lightweight, easy-to-install product that is made from real stone. It is available in a variety of colors and textures, and is perfect for creating a timeless look for any home or commercial building.

The prices of Eldorado Stone products vary depending on the type of product and the size of the project. Natural stone veneer typically ranges from $7 to $15 per square foot, while thin brick veneer typically ranges from $8 to $20 per square foot. Architectural stone veneer typically ranges from $10 to $25 per square foot. Additionally, installation costs may vary depending on the complexity of the project.

In conclusion, Eldorado Stone offers a variety of products for both interior and exterior applications. Natural stone veneer, thin brick veneer, and architectural stone veneer are all available in a variety of colors and textures. Prices for these products range from $7 to $25 per square foot, depending on the type of product and the size of the project. Installation costs may also vary depending on the complexity of the project.Stone Stories: Understanding Eldorado Stone Pricing is an invaluable resource for anyone looking to purchase Eldorado Stone products. It provides an in-depth look at the pricing structure of the company, as well as a comprehensive overview of the different types of stone products available. With this information, customers can make informed decisions about their purchases and ensure they get the best value for their money. Additionally, the book provides helpful tips and advice on how to properly care for and maintain Eldorado Stone products. All in all, Stone Stories: Understanding Eldorado Stone Pricing is an essential guide for anyone looking to purchase Eldorado Stone products.

Garage Glam: DIY Garage Door Makeovers

Garage Glam is a unique and innovative way to give your garage door a makeover. With Garage Glam, you can transform your garage door into a beautiful and stylish feature of your home. With a variety of colors, textures, and designs to choose from, you can create a look that is unique to your home. Garage Glam is easy to install and requires no special tools or skills. With Garage Glam, you can give your garage door a makeover that will last for years to come.

How to Transform Your Garage Door with a DIY Makeover

The garage door is often the first thing people see when they look at a home, and it can be a great way to add curb appeal and value to a property. With a few simple DIY steps, homeowners can transform their garage door with a makeover that will make it look like new.

The first step in a DIY garage door makeover is to clean the door thoroughly. This will help to remove any dirt, dust, and debris that has built up over time. A pressure washer can be used to remove any stubborn dirt and grime, and a mild detergent can be used to clean the door. Once the door is clean, it is important to inspect it for any damage or wear and tear. If any repairs are needed, they should be completed before the makeover begins.

The next step is to choose a paint color for the garage door. It is important to choose a color that complements the home’s exterior and fits in with the overall aesthetic. Once the color is chosen, the door should be sanded and primed before painting. It is important to use a high-quality paint that is designed for outdoor use.

Once the paint is dry, homeowners can add decorative hardware to the door. This can include handles, hinges, and other hardware that will give the door a unique look. It is also possible to add a decorative window to the door, which can be a great way to add light and ventilation to the garage.

Finally, homeowners can add a sealant to the door to protect it from the elements. This will help to keep the door looking like new for years to come.

With a few simple steps, homeowners can transform their garage door with a DIY makeover. This can be a great way to add value and curb appeal to a home, and it can be done in a relatively short amount of time.

Get the Glam Look: Tips for Adding Style to Your Garage Door with a DIY Makeover

A garage door can be a major focal point of a home’s exterior, and a DIY makeover can be a great way to add style and personality to your home. With a few simple steps, you can transform your garage door into a stylish and eye-catching feature.

First, consider the color of your garage door. If you’re looking to make a bold statement, consider painting your door a bright, vibrant color. If you’d prefer a more subtle look, choose a neutral color such as white, gray, or beige. Once you’ve chosen a color, you can begin to add decorative elements to your door.

One way to add style to your garage door is to install decorative hardware. Choose hardware that complements the color of your door and adds a touch of sophistication. You can also add decorative trim around the edges of the door to give it a more finished look.

Another way to add style to your garage door is to install a window. Choose a window that complements the color of your door and adds a touch of light and airiness to the space. You can also add a decorative window treatment to the window to give it a more finished look.

Finally, consider adding a decorative wreath or other hanging decoration to your garage door. This will add a touch of personality and charm to the space.

With a few simple steps, you can transform your garage door into a stylish and eye-catching feature. Choose a color, add decorative hardware, install a window, and hang a wreath or other decoration to give your garage door a unique and stylish makeover.Garage Glam: DIY Garage Door Makeovers is an excellent resource for anyone looking to give their garage door a makeover. With easy-to-follow instructions and helpful tips, this book provides a great way to add a unique touch to your home. Whether you’re looking to add a splash of color, a unique design, or just a bit of extra protection, Garage Glam: DIY Garage Door Makeovers has something for everyone. With its comprehensive guide and helpful advice, this book is sure to help you create the perfect garage door makeover.

Window Wisdom: Creating Comfort with a DIY Window Seat

Window Wisdom is a DIY guide to creating a comfortable and stylish window seat in your home. Whether you’re looking to add a cozy spot to curl up with a book or a stylish addition to your living room, Window Wisdom has the tips and tricks you need to make your window seat dreams come true. With easy-to-follow instructions and helpful illustrations, you’ll be able to create a beautiful window seat that will be the envy of your friends and family. So, if you’re ready to add a touch of comfort and style to your home, Window Wisdom is the perfect guide to get you started.

How to Create a Cozy Window Seat with DIY Projects

Creating a cozy window seat is a great way to add a comfortable and inviting atmosphere to any room. With a few DIY projects, you can easily transform an unused corner of your home into a cozy window seat. Here are some tips for creating a cozy window seat with DIY projects.

First, decide on the size and shape of your window seat. Measure the area where you plan to place the window seat and determine the size and shape that will best fit the space. Consider the type of seating you would like to have, such as a bench, a loveseat, or a chair.

Next, choose the materials for your window seat. You can use wood, fabric, foam, or any other material that you think will create a comfortable and inviting atmosphere. Consider the color and texture of the materials to ensure that they will match the rest of the room.

Once you have chosen the materials, you can begin to assemble the window seat. If you are using wood, you will need to cut the pieces to the desired size and shape. If you are using fabric, you will need to sew the pieces together. If you are using foam, you will need to glue the pieces together.

Finally, you can add the finishing touches to your window seat. Consider adding cushions, pillows, or throws to make the seat more comfortable. You can also add curtains or blinds to the window to create a cozy atmosphere.

Creating a cozy window seat with DIY projects is a great way to add a comfortable and inviting atmosphere to any room. With a few simple steps, you can easily transform an unused corner of your home into a cozy window seat.

Maximizing Comfort and Style with Window Seats: Tips and Tricks

Window seats are a great way to add comfort and style to any room. Not only do they provide a cozy spot to relax and enjoy the view, but they can also be a great way to add a unique touch to your home. Here are some tips and tricks for maximizing comfort and style with window seats.

1. Choose the Right Size: When selecting a window seat, make sure to choose one that is the right size for the space. Too small and it won’t be comfortable, too large and it will take up too much space. Measure the area carefully and choose a seat that fits the space perfectly.

2. Choose the Right Material: Window seats come in a variety of materials, from wood to fabric to leather. Choose a material that is comfortable and durable, and that will match the style of the room.

3. Add Pillows and Cushions: Pillows and cushions are a great way to add comfort and style to a window seat. Choose colors and patterns that match the room’s decor, and make sure to choose materials that are comfortable and durable.

4. Add Storage: Window seats are a great way to add extra storage to a room. Look for seats with built-in drawers or shelves, or add baskets or bins underneath the seat for extra storage.

5. Add Lighting: Adding lighting to a window seat can create a cozy atmosphere and make it easier to read or relax. Look for wall sconces or table lamps that will fit the style of the room.

By following these tips and tricks, you can create a comfortable and stylish window seat that will be the perfect addition to any room.Window Wisdom is a great way to create a cozy and comfortable space in your home. With a few simple tools and materials, you can easily create a beautiful window seat that will add a touch of style and comfort to any room. Whether you’re looking for a place to relax and read a book or just a spot to enjoy the view, a DIY window seat is a great way to make the most of your windows. With Window Wisdom, you can create a unique and inviting space that will be enjoyed for years to come.

Pocket Door Perfection: A Guide to Pocket Door Installation

Pocket Door Perfection: A Guide to Pocket Door Installation is an essential resource for anyone looking to install a pocket door in their home. This guide provides detailed instructions on how to properly install a pocket door, from selecting the right door to the final touches. It also covers topics such as door hardware, framing, and finishing. With this guide, you can be sure that your pocket door will be installed correctly and look great. Whether you are a DIYer or a professional contractor, this guide will help you get the job done right.

How to Choose the Right Pocket Door for Your Home: A Guide to Pocket Door Installation

Installing a pocket door is a great way to maximize space in your home. Pocket doors are a great option for small spaces, as they slide into the wall and don’t take up any extra room. However, choosing the right pocket door for your home can be a daunting task. This guide will provide you with the information you need to make an informed decision when it comes to pocket door installation.

First, consider the size of the pocket door you need. Pocket doors come in a variety of sizes, so you’ll need to measure the space you’re working with to determine the size of the door you need. You’ll also need to consider the weight of the door, as heavier doors require more robust hardware.

Next, consider the type of pocket door you need. There are two main types of pocket doors: single-panel and double-panel. Single-panel doors are the most common type and are typically used for smaller spaces. Double-panel doors are larger and are typically used for larger spaces.

Once you’ve determined the size and type of pocket door you need, you’ll need to decide on the material. Pocket doors are typically made from wood, metal, or glass. Wood is the most common material, as it is durable and easy to customize. Metal is a great option for a modern look, while glass is a great option for a more contemporary look.

Finally, you’ll need to decide on the hardware for your pocket door. There are a variety of hardware options available, including handles, locks, and hinges. You’ll need to choose hardware that is compatible with the material of your door and that is strong enough to support the weight of the door.

Installing a pocket door can be a great way to maximize space in your home. By following this guide, you’ll be able to make an informed decision when it comes to pocket door installation. With the right pocket door, you’ll be able to enjoy the extra space and functionality that a pocket door provides.

Tips for Installing Pocket Doors: A Step-by-Step Guide to Pocket Door Perfection

Installing pocket doors can be a great way to add a unique and stylish touch to any home. However, it is important to take the time to properly install pocket doors in order to ensure that they are secure and function properly. This step-by-step guide will provide tips for installing pocket doors in order to achieve pocket door perfection.

Step 1: Measure the Doorway

The first step in installing pocket doors is to measure the doorway. Measure the width and height of the doorway and make sure to account for any trim or molding that may be present. This will help to ensure that the pocket door will fit properly.

Step 2: Prepare the Doorway

Once the measurements have been taken, the next step is to prepare the doorway. This includes removing any existing trim or molding, as well as any drywall or plaster that may be present. It is important to make sure that the doorway is completely clear before proceeding.

Step 3: Install the Pocket Door Frame

The next step is to install the pocket door frame. This should be done carefully, making sure to follow the manufacturer’s instructions. It is important to make sure that the frame is level and secure before proceeding.

Step 4: Install the Pocket Door

Once the frame is installed, the pocket door can be installed. This should be done carefully, making sure to follow the manufacturer’s instructions. It is important to make sure that the door is level and secure before proceeding.

Step 5: Install the Door Hardware

The final step is to install the door hardware. This includes the door handle, latch, and any other hardware that may be necessary. It is important to make sure that all of the hardware is secure and functioning properly before proceeding.

By following these steps, you can ensure that your pocket door is installed properly and securely. Taking the time to properly install pocket doors can help to ensure that they are secure and function properly for years to come.Pocket door installation can be a daunting task, but with the right tools and knowledge, it can be a relatively simple process. Pocket Door Perfection: A Guide to Pocket Door Installation provides a comprehensive guide to the installation process, from selecting the right door to the final touches. With its step-by-step instructions and helpful tips, this guide is an invaluable resource for anyone looking to install a pocket door. Whether you’re a novice or an experienced DIYer, Pocket Door Perfection: A Guide to Pocket Door Installation is the perfect guide to help you achieve pocket door perfection.

Underbed Marvels: Maximizing Space with Underbed Drawers

Underbed Marvels is a company that specializes in maximizing space with underbed drawers. Their products are designed to help you make the most of the space under your bed, allowing you to store items that would otherwise take up valuable space in your home. With their innovative designs, Underbed Marvels can help you create a clutter-free and organized living space. Their products are made from high-quality materials and are designed to last for years. Whether you need extra storage for clothes, toys, books, or anything else, Underbed Marvels has the perfect solution for you.

How to Make the Most of Your Bedroom Space with Underbed Drawers

Maximizing bedroom space can be a challenge, especially when dealing with limited square footage. One of the best ways to make the most of your bedroom space is to utilize underbed drawers. Underbed drawers are a great way to store items that are not used on a daily basis, such as extra bedding, seasonal clothing, and other items that need to be tucked away.

When selecting underbed drawers, it is important to consider the size of the drawers and the type of material they are made from. The size of the drawers should be based on the size of the bed and the items that will be stored in them. For example, if you are storing extra bedding, you may want to opt for larger drawers. Additionally, the material of the drawers should be chosen based on the items that will be stored in them. For example, if you are storing heavier items, such as books, you may want to opt for a sturdier material, such as wood or metal.

Once you have selected the right size and material for your underbed drawers, it is important to ensure that they are properly installed. If you are not comfortable with the installation process, it is best to hire a professional to do the job. Additionally, it is important to make sure that the drawers are securely attached to the bed frame. This will help to ensure that the drawers do not move or become loose over time.

Finally, it is important to keep the drawers organized. This can be done by labeling the drawers and using dividers to separate items. Additionally, it is important to regularly clean out the drawers to ensure that items are not forgotten or lost.

By utilizing underbed drawers, you can make the most of your bedroom space and ensure that items are stored safely and securely. With the right size and material, as well as proper installation and organization, you can maximize your bedroom space and make the most of your storage needs.

Creative Storage Solutions: Utilizing Underbed Drawers to Maximize Space

Maximizing storage space in a home can be a challenge, especially in smaller spaces. One creative solution to this problem is to utilize underbed drawers. Underbed drawers are a great way to make use of the space beneath a bed, which is often overlooked. These drawers can be used to store a variety of items, from clothing and linens to books and toys.

Underbed drawers are typically made of wood or plastic and come in a variety of sizes and styles. They can be purchased at most home goods stores or online. When selecting underbed drawers, it is important to consider the size of the bed and the items that will be stored in them. For example, if the bed is a twin size, then a smaller set of drawers may be more appropriate. Additionally, if the items to be stored are bulky, then a larger set of drawers may be necessary.

Once the drawers have been purchased, they can be easily installed. Most sets come with instructions and hardware for installation. It is important to make sure that the drawers are securely attached to the bed frame and that they are level. This will ensure that the drawers open and close properly.

Underbed drawers are a great way to maximize storage space in a home. They can be used to store a variety of items, from clothing and linens to books and toys. Additionally, they are easy to install and come in a variety of sizes and styles. Utilizing underbed drawers is a creative solution to the problem of limited storage space in a home.Underbed Marvels is an innovative way to maximize space in any bedroom. With its easy-to-install design, it can be used to store items such as clothing, bedding, and toys. It is a great way to keep your bedroom organized and clutter-free. With its durable construction and sleek design, Underbed Marvels is a great choice for anyone looking to maximize their bedroom space.