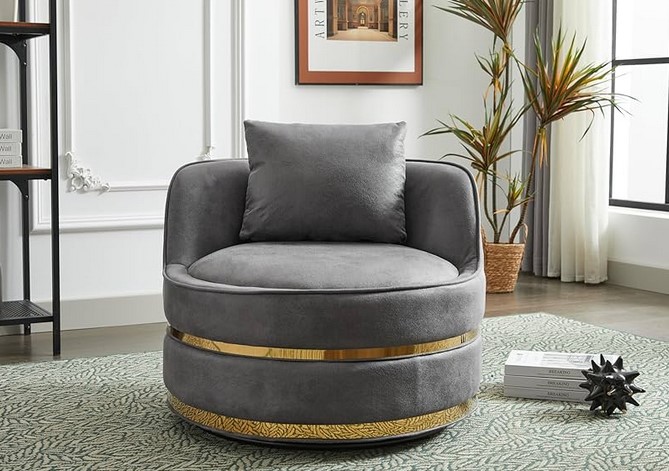
Sustainable Utility Access: Ensuring Reliable Flow with the Rain Barrel Spigot

Source:https://rapidroofing.com

Imagine a sweltering July afternoon. Your garden is parched, the local municipality has just announced a Stage 2 water restriction, and your expensive ornamental shrubs are starting to curl. You walk over to your catchment system, turn the handle, and… nothing. Or worse, a slow, pathetic dribble that wouldn’t quench the thirst of a single tomato plant. All that free water is trapped inside the drum because a $10 component—the Rain Barrel Spigot—has failed or was installed with poor mechanical logic.

In my decade of designing sustainable landscapes and off-grid utility systems, I’ve seen hundreds of rain barrels. Most homeowners focus on the size of the tank or the color of the plastic. But after years of troubleshooting “dry” gardens, I can tell you that the spigot is the heart of the system. If the heart doesn’t pump, the system is just a stagnant mosquito breeder. Mastering the installation and physics of your output valve is the difference between a decorative hobby and a reliable secondary utility.


The Physics of Gravity-Fed Flow: Why Your Spigot Struggles

To understand the Rain Barrel Spigot, you must first understand that you are fighting a battle against low pressure. Unlike your indoor plumbing, which is pressurized by city pumps to about 40–60 PSI, a rain barrel relies entirely on gravity.

For every foot you raise a water barrel off the ground, you only gain about 0.43 PSI. This means that if your barrel is sitting flat on the dirt, the water pressure at the spigot is nearly non-existent.

The Straw Analogy

Think of your rain barrel like a giant soda cup and the spigot like a straw. If you try to drink through a tiny, crimped straw (a low-quality, narrow-bore spigot), you have to work incredibly hard to get any liquid. But if you use a wide boba straw (a full-port ball valve spigot), the liquid flows effortlessly. In a gravity system, you want the “widest straw” possible to maximize the limited pressure you have.


Choosing Your Hardware: Brass vs. Plastic Logistics

When you’re shopping for a Rain Barrel Spigot, you’ll generally see two materials. In my professional experience, this choice dictates the lifespan of your entire sustainability project.

  • Zinc/Plastic Spigots: These often come “free” with DIY kits. They are prone to UV degradation and the handles tend to snap after one icy winter.

  • Heavy-Duty Brass Spigots: This is the professional standard. Brass is corrosion-resistant and has the structural integrity to handle the “torque” of a heavy garden hose being pulled.

  • Quarter-Turn Ball Valves: Always look for a “ball valve” design rather than a “gate valve” (the kind you have to twist multiple times). A ball valve offers a straight-through path for the water, which is critical for maintaining flow in gravity-fed systems.


Tactical Installation: The Art of the Watertight Seal

I’ve crawled inside more 55-gallon drums than I care to admit to fix “mysterious leaks.” The point where the Rain Barrel Spigot meets the barrel wall is the most common failure point in residential water harvesting.

The “Bulkhead” Advantage

Never just screw a spigot into a hole you drilled in plastic. The plastic walls of a drum are too thin to hold threads securely. You must use a Bulkhead Fitting. This is a threaded pipe with a wide flange and a high-grade EPDM or silicone gasket. It “sandwiches” the barrel wall, creating a mechanical seal that won’t wiggle loose.

Positioning for Maximum Yield

I see many beginners install their spigot at the very bottom of the barrel to get every drop of water. This is a mistake. Peringatan Tersembunyi: Every rain barrel accumulates “bio-sludge” or sediment at the bottom. If your spigot is too low, you will constantly clog your valve or your soaker hoses with gunk. Install your spigot about 2 to 3 inches from the bottom to allow a “settling zone” for debris.


Step-by-Step Logistics for the Intermediate DIYer

If you are ready to upgrade your utility access, follow this professional workflow:

  1. Drill the Pilot: Use a hole saw bit that matches the outer diameter of your bulkhead fitting. Go slow; high-speed drilling can melt the plastic, leaving a ragged edge that won’t seal.

  2. The Fishing Technique: If you don’t have long arms, tie a string to a heavy nut and drop it through the top of the barrel and out the hole. Slide your bulkhead fitting onto the string and “fish” it down to the hole.

  3. Gasket Logic: The gasket always goes on the inside of the barrel. The nut on the outside provides the compression.

  4. Reverse Threads: Be aware that many bulkhead fittings are left-hand threaded to prevent them from loosening when you screw the spigot into them. Check the markings!


Expert Advice: Scaling Your Flow Rate

Here is an insight that separates a “bucket-filler” from a “garden-irrigator”: Standard garden hoses are the enemy of gravity water.

A 50-foot garden hose creates immense friction loss. Even with a perfect Rain Barrel Spigot, you might find the flow at the end of the hose is disappointing.

Tips Pro: The “Short and Fat” Strategy

Use a high-flow, short-length “utility hose” (usually 5/8″ or 3/4″ diameter) to connect your barrel to your watering can or your garden bed. If you need to run water further away, you must elevate your barrel onto a platform of cinder blocks—at least two feet high—to give the water the “head pressure” it needs to overcome hose friction.


Maintenance: The Winterization Protocol

In my ten years of practice, I’ve replaced more split spigots in April than at any other time of year. If water stays inside a brass Rain Barrel Spigot during a hard freeze, the expanding ice will split the metal like a peanut shell.

  • Drain and Open: Before the first frost, drain the barrel completely.

  • The “Half-Cocked” Valve: Leave the ball valve spigot in a 45-degree open position. If it’s fully closed, water trapped inside the ball mechanism will freeze and crack the valve body. If it’s fully open, it can still trap moisture in the seals. 45 degrees is the safety sweet spot.


Enhancing Reliability: Screens and Overflows

Your Rain Barrel Spigot is only as reliable as the water entering the tank.

  • Debris Screening: Always use a fine mesh screen at the intake. If a single leaf gets through and makes its way to the spigot, it can act as a “flap valve,” randomly cutting off your flow.

  • The Overflow Logistics: Ensure your overflow pipe is larger than your intake. If the barrel overfills and puts pressure on the top seal, it can create a vacuum or a surge that stresses the spigot’s bulkhead connection.


Conclusion: Mastering Your Micro-Utility

Building a sustainable home is about mastering the small details of resource management. The Rain Barrel Spigot might seem like a minor piece of hardware, but it is the interface between your stored resource and your living landscape. By selecting high-quality brass, utilizing bulkhead fittings, and respecting the laws of gravity and sediment, you ensure that your “reliable flow” is there when the heat is on and the taps are dry.

There is a unique satisfaction in turning a handle and watching “captured” water nourish your garden. It’s a closed-loop success story that starts with one well-installed valve.

Is your rain barrel currently sitting on the ground, or have you elevated your system for better pressure? Are you struggling with a leaky connection or a slow drip? Let’s troubleshoot your sustainable water setup in the comments—I’m here to help you get the water moving!

Advanced Climate Sealing: Enhancing Energy Efficiency with the Weatherstrip Tape Roll

Source:https://m.media-amazon.com

You’re sitting on your sofa on a quiet Tuesday evening when you feel it—a ghost-like finger of ice-cold air stroking the back of your neck. You check the thermostat; it’s set to a cozy 72°F, yet the furnace is groaning like it’s running a marathon. In many homes, the cumulative gaps around windows and doors are equivalent to leaving a medium-sized window wide open all year round. You aren’t just heating your home; you are literally paying to heat the neighborhood.

In my decade of traversing drafty attics and performing energy audits, I’ve learned that “energy efficiency” isn’t always about expensive solar panels or triple-pane windows. Sometimes, the most powerful tool in my arsenal is a simple Weatherstrip Tape Roll. I’ve seen $20 worth of high-quality foam and rubber save homeowners hundreds in seasonal utility bills. It is the “low-hanging fruit” of home improvement—the invisible shield that keeps your expensive conditioned air exactly where it belongs.


The Physics of the Leak: Why Your House “Breathes” Wrong

To understand why a Weatherstrip Tape Roll is vital, we have to talk about pressure. Your home is a pressurized vessel. In the winter, warm air rises and escapes through the top of the house (the stack effect), which creates a vacuum that sucks cold air in through the gaps in your doors and windows.

When we apply weatherstripping, we aren’t just “blocking a breeze.” We are stabilizing the internal pressure of the building envelope. By sealing these micro-apertures, you allow your HVAC system to reach its “set point” faster and stay there longer, reducing mechanical wear and tear.

The Winter Jacket Analogy

Think of your home’s insulation like a thick wool sweater. It keeps you warm, but if a gust of wind hits you, the air goes right through the knit. You need a windbreaker over that sweater to stop the air movement. A Weatherstrip Tape Roll is that windbreaker—it provides the airtight seal that makes the insulation actually do its job.


Navigating the Material Logistics: Foam, Rubber, or Silicone?

When you walk into a hardware store and grab a Weatherstrip Tape Roll, you’ll see a dizzying array of materials. Over the years, I’ve developed a “cheat sheet” for which material belongs in which tactical position.

  • Open-Cell Foam: The most affordable and easiest to compress. It’s great for interior doors or windows that stay shut. However, it’s like a sponge; it absorbs water and degrades quickly in the sun.

  • Closed-Cell Foam: Much more durable than open-cell. It resists water, making it an excellent intermediate choice for window sashes.

  • EPDM Rubber (D-Profile or P-Profile): This is my professional go-to. It’s incredibly resilient and “bounces back” to its original shape after years of being squashed in a door frame.

  • Silicone Tape: The premium option. It remains flexible even in -40°F weather and offers the best long-term UV resistance.


Tactical Installation: Mastering the “Invisible Seal”

Applying a Weatherstrip Tape Roll looks easy, but there is a logistical sequence you must follow to ensure the adhesive doesn’t fail within the first month.

1. The Surgical Clean

I have seen more weatherstripping fail because of dust than because of poor adhesive. You must clean the “stop” of the door or the window track with denatured alcohol or a high-strength degreaser. If there is even a hint of old adhesive or household oils, your tape will peel off the moment the temperature changes.

2. Compression Calibration

The goal is a “snug” fit, not a “struggle.” If you choose a tape that is too thick, you will have to slam your door to latch it, which puts immense stress on the hinges and the strike plate.

  • The Paper Test: Close the door on a single sheet of paper. If you can pull the paper out with no resistance, the seal is too thin. If the paper rips, it’s too thick. You want a “firm drag.”

3. Measuring Twice, Cutting Once

When working with a Weatherstrip Tape Roll, always start with the vertical sides. Ensure the tape is one continuous piece. Gaps at the corners are the primary failure points where air “whistles” through.


Expert Advice: The “Hidden” Hinge Gap

Here is an insight that only comes from years of chasing drafts: Most people forget the hinge side.

Homeowners usually seal the top and the “handle side” of the door, but the gap behind the hinges is often the largest. However, if you place thick weatherstripping directly behind the hinge, you create a “fulcrum” that can actually bend your hinges or prevent the door from closing.

Tips Pro: The “Offset” Strategy

On the hinge side, don’t place the tape on the flat face of the door stop. Instead, place it on the corner of the stop so the door “kisses” it as it closes rather than squashing it flat. This provides a seal without the mechanical resistance that ruins door alignment.


The Adhesive Temperature Trap

This is the most common mistake for beginners. Most Weatherstrip Tape Roll adhesives are pressure-sensitive and temperature-dependent. If you try to apply the tape when the door frame is 40°F or colder, the glue will “freeze” rather than bond.

  • The Fix: If you must seal your home in the dead of winter, use a heat gun or a hair dryer to warm up the door frame to at least 60°F before applying the tape. Once the bond is set, it can handle the cold, but it needs warmth to “introduce” itself to the surface.


Scaling Energy Efficiency: Beyond the Front Door

While we focus on doors, a Weatherstrip Tape Roll is a versatile infrastructure tool. In my decade of practice, I’ve used it to solve problems that have nothing to do with drafts:

  1. Attic Hatch Sealing: The attic door is often the biggest “chimney” in the house. Sealing this hatch is the single most effective 10-minute job you can do.

  2. Vibration Dampening: I’ve used thin foam tape under vibrating appliances or between rattling HVAC ducts to silence a noisy house.

  3. Light Blocking: For home theaters or bedrooms, weatherstripping is the perfect solution to kill that annoying light bleed from under the door.


Maintenance: The “Seasonal Pinch”

Rubber and foam are organic materials that degrade. I recommend a “Tactical Inspection” twice a year—once before the heating season and once before the cooling season.

  • Check for Memory: If the rubber stays flat when the door is open, it has “taken a set” and lost its elasticity. It’s no longer sealing.

  • Clean the Seal: Wipe your weatherstripping with a damp cloth. Dirt and grit act like sandpaper, slowly grinding away the seal every time you open the door.


Conclusion: Reclaiming Your Climate

Mastering the Weatherstrip Tape Roll is about more than just “saving money”—it’s about reclaiming the comfort of your sanctuary. When you understand the logistics of compression, the chemistry of the adhesive, and the physics of the stack effect, you move from being a victim of the weather to a master of your environment.

Don’t let your hard-earned money leak out through the cracks. Take a roll of tape, find the “ghosts” in your hallway, and seal them out for good.

Can you hear the wind whistling through your front door tonight, or do you feel a cold spot near your windows? What’s the biggest gap you’ve found in your home’s “armor” lately? Let me know in the comments—I’m here to help you get that perfect, airtight seal!

Professional Grooming Logistics: Streamlining Access with the Hair Tool Station

Source:https://media.modernluxury.com

You are running ten minutes late for a critical meeting. You reach for your hair dryer, but the cord is hopelessly strangled around the curling iron and a rogue bottle of hairspray. As you yank it free, the hot flat iron slides off the vanity, melting a permanent “scar” into your expensive bathroom rug. In that moment of chaos, your bathroom isn’t a sanctuary; it’s a high-heat hazard zone. This “morning tangle” is the primary reason for countertop clutter and, surprisingly, a leading cause of localized electrical fires in residential bathrooms.

In my decade of redesigning cramped master baths and optimizing vanity workflows, I’ve realized that most people treat their grooming electronics like kitchen utensils—shoved into a drawer and forgotten. But after seeing dozens of scorched drawer liners and frayed power cords, I can tell you that a dedicated Hair Tool Station isn’t just a luxury; it’s an essential piece of home infrastructure. It is the difference between a frantic morning scramble and a professional-grade grooming routine.


The Physics of Thermal Storage: Why a Dedicated Station Matters

To understand the necessity of a Hair Tool Station, we have to look at the logistics of “thermal dissipation.” Most grooming tools operate at temperatures between 200°F and 450°F. When you finish styling and immediately place a hot iron into a wooden drawer or a plastic bin, you are trapping heat in a confined space.

A professional station is engineered to manage this heat. By using heat-resistant materials like stainless steel or high-grade silicone, these organizers allow your tools to “cool down” in an open-air environment while being safely separated from flammable surfaces.

The Airport Hangar Analogy

Think of your bathroom vanity as a busy airport. Your hair dryer, flat iron, and curling wand are the planes. Without a Hair Tool Station, you are trying to park three jets in a single, wooden garage while the engines are still glowing hot. A proper station acts like a dedicated hangar with reinforced bays—giving each “jet” its own space to idle and cool without melting the building down.


Choosing Your Logistics Hub: Types of Hair Tool Stations

When I’m consulting on a bathroom remodel, I categorize grooming organizers into three tactical levels based on the user’s space and tool inventory.

1. The Countertop Caddy

This is the most common entry point for beginners. These are standalone units made of acrylic or metal that sit directly on the vanity.

  • Best for: Renters or those with ample counter space.

  • Technical Spec: Look for units with weighted bases. There is nothing more frustrating than a caddy that tips over every time you pull the heavy cord of a blow dryer.

2. The Over-the-Door/Wall-Mounted Rack

This is the “Vertical Expansion” strategy. By utilizing the back of a cabinet door or an empty patch of wall, you reclaim 100% of your counter “real estate.”

  • Best for: Small apartments or pedestal sinks.

  • Expert Insight: Ensure you use heavy-duty anchors if mounting to drywall. Three grooming tools plus their cords can easily exceed five pounds of constant tension.

3. The Integrated Pull-Out Drawer

This is the professional’s choice. In high-end renovations, we build a Hair Tool Station directly into the cabinetry, complete with internal power outlets.

  • Best for: Homeowners doing a full remodel.

  • Logistics Win: It keeps the cords completely invisible and eliminates the “plug-unplug” ritual every morning.


Strategic Cord Management: The Silent Productivity Killer

The biggest “drain” on your morning productivity isn’t the styling itself—it’s the cord logistics. Standard grooming tools have cords ranging from 6 to 9 feet. Without a Hair Tool Station, these cords become a “spaghetti pile” that traps moisture and dust.

  • Cable Strain Relief: When you wrap a cord tightly around a tool, you create “mechanical stress” at the point where the wire meets the handle. Over time, this causes internal fraying.

  • Individual Holsters: A quality station provides separate tubes for each tool, allowing the cords to hang freely or be tucked into a dedicated rear compartment. This prevents “cross-tangling” and extends the lifespan of your expensive electronics.


Step-by-Step Logistics for a Custom Station Setup

If you want to move from “beginner” to “pro” in your organization, follow this workflow for setting up your station:

  1. Inventory Your Wattage: Identify which tools you use daily. If you have a high-wattage blow dryer (1800W+), ensure your station’s holster is wide enough for the nozzle and has sufficient airflow.

  2. Heat-Zone Mapping: Place the station on the “non-dominant” side of your sink. If you are right-handed, place the station on the left. This prevents you from reaching across a hot iron to grab your toothbrush.

  3. The “Dry-Run” Plug-In: Before mounting anything, plug all your tools in. Ensure the cords reach the styling mirror without being taut. A taut cord is a trip hazard and a “knock-over” risk for your station.


Expert Advice: The “Internal Metal” Secret

Here is an insight from a decade in home improvement: Not all “metal” inserts are safe.

Many cheap, mass-market hair tool organizers use thin aluminum or painted steel inserts. After six months of contact with a hot curling iron, the paint can peel and “bond” to your tool, ruining the ceramic coating.

Tips Pro: The Stainless Steel Standard

Always verify that your Hair Tool Station uses 304-grade stainless steel or high-heat silicone sleeves. These materials won’t oxidize or transfer chemicals to your styling tools. If the insert feels like plastic, it probably is—and it will eventually fail under the stress of a 400-degree flat iron.


The Dust and Hairspray Trap

Your grooming area is a high-residue environment. Airborne hairspray and fine hair clippings settle into the bottom of tool holsters, creating a “sticky felt” that can actually be flammable.

  • Removable Inserts: Choose a Hair Tool Station where the metal cups can be removed and washed.

  • Drainage/Airflow Holes: Ensure the bottom of the holsters has openings. This prevents heat from being trapped at the base and allows dust to fall through rather than accumulating around the heating elements.


Scaling Productivity: The “Ready-State” Workflow

The ultimate goal of professional grooming logistics is “Ready-State.” This means every tool is plugged in (safely), positioned correctly, and accessible with one hand. When your station is set up correctly:

  • You save an average of 4-6 minutes per morning by eliminating cord untangling.

  • You reduce the risk of “surface damage” to your vanity to zero.

  • You extend the mechanical life of your tools by 30% by preventing drops and cord stress.


Conclusion: Reclaiming Your Morning Sanctuary

Your bathroom should be the place where you prepare to face the world, not a source of frustration and heat-related anxiety. Implementing a Hair Tool Station is a small engineering win that provides a massive return on investment in both safety and sanity. By respecting the thermal needs of your tools and mastering the logistics of cord management, you transform a cluttered counter into a high-performance grooming hub.

Take a look at your vanity right now. If it looks like a “spaghetti factory” of cords and hot metal, it’s time to upgrade your infrastructure.

How many hair tools are currently fighting for space on your countertop? Are you dealing with a “cord-pocalypse,” or have you found a mounting solution that actually works? Let’s talk bathroom logistics in the comments below!