During an intense summer thunderstorm early in my contracting career, I received a frantic call from a homeowner who reported loud sizzling noises coming from his main circuit breaker panel. When I arrived at the property, water was actively trickling down the main electrical service cable, dripping straight into his breaker enclosure. The culprit wasn’t a damaged roof or a broken window—it was a cracked, decades-old plastic hood sitting high up on his roofline.
Over my ten-plus years in residential contracting and electrical service work, I’ve seen this exact nightmare play out far too many times. Homeowners invest heavily in surge protectors, smart home panels, and backup generators, yet completely overlook the small, hooded fitting perched at the top of their electrical mast.
A neglected service entrance cap (often called a weatherhead or service head) is a vulnerable entry point for moisture intrusion, line corrosion, and catastrophic electrical failures. Securing this critical connection point isn’t just a matter of routine maintenance; it is an essential protocol for protecting your home’s entire electrical backbone. Let’s dive into how this fixture works, how to spot failure points early, and how to maintain long-term service integrity.
The Invisible Umbrella: Why Your Service Entrance Cap Matters
To understand why a small fitting carries such massive importance, you have to look at how overhead utility power transitions into your home. Electrical service wires run from a utility pole through the open air before connecting to your home’s vertical conduit mast or service cable.
Think of your home’s electrical conduit like a giant drinking straw sticking straight up into the sky. Without a proper cover on top, every rainstorm would fill that straw with water, sending gallons of rain directly into your home’s main breaker box.
+-----------------------------------------------------------------------+
|                    OVERHEAD UTILITY ENTRY DYNAMICS                    |
|                                                                       |
|   [ Utility Power Lines ] ---> [ Overhead Drip Loop ]                 |
|                                         |                             |
|                                         v (Gravity Water Shed)        |
|   [ Main Breaker Panel ] <---(Dry Conduit)--- [ Service Entrance Cap ]|
+-----------------------------------------------------------------------+
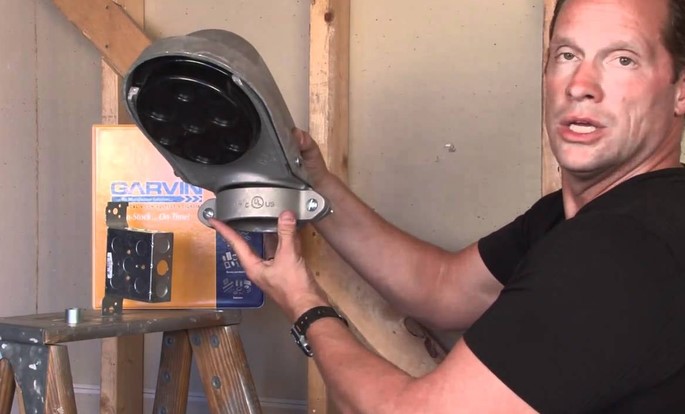
A service entrance cap acts like a specialized, heavy-duty umbrella for that straw. It routes heavy service conductors through insulated knockouts while curving downward at a 180-degree angle to prevent rain, wind-driven snow, and debris from entering the vertical conduit or cable sheath.
Anatomy and Material Breakdown: Aluminum vs. PVC vs. Cast Iron
Walk down the electrical aisle at any trade supply house, and you’ll find weatherheads in various materials and clamping configurations. Choosing the right material dictates your system’s long-term environmental durability.
+-----------------------------------------------------------------+
|                   MATERIAL PERFORMANCE MATRIX                   |
+----------------------+--------------------+---------------------+
| Material Type        | Lifespan Expectancy| Primary Failure Mode|
+----------------------+--------------------+---------------------+
| Polyvinyl Chloride   | 10 – 15 Years      | UV Embrittlement    |
| Cast Aluminum Alloy  | 25 – 40+ Years     | Loose Clamp Screws  |
| Galvanized Iron      | 20 – 30 Years      | Rust & Corrosion    |
+----------------------+--------------------+---------------------+
1. Cast Aluminum Alloy
-
Pros: Highly resistant to rust, lightweight, durable against branch strikes, and widely mandated by modern building codes.
-
Cons: Requires anti-oxidant joint compound when mating with steel conduit to prevent galvanic corrosion.
-
Best Use: Standard rigid metallic conduit (RMC) or intermediate metal conduit (IMC) overhead service masts.
2. PVC (Polyvinyl Chloride) Weatherheads
-
Pros: Completely non-conductive, affordable, and immune to moisture-induced rust.
-
Cons: Vulnerable to long-term ultraviolet (UV) degradation. Over years of intense sun exposure, cheap PVC becomes brittle and prone to cracking under storm stress.
-
Best Use: Schedule 80 PVC conduit runs in non-extreme temperature zones.
3. Phenolic Insulated Faceplates
The most critical sub-component inside any service entrance cap is its phenolic insulator plate. This non-conductive plate contains individual smoothed holes that keep incoming uninsulated service wires safely separated, preventing short circuits and arcs.
The Critical Point of Failure: The Drip Loop Connection
When evaluating an overhead electrical service, the weatherhead works hand-in-hand with a vital installation detail known as the drip loop.
+-----------------------------------------------------------------+
|                    ANATOMY OF A SAFE DRIP LOOP                  |
+-----------------------------------------------------------------+
| UTILITY WIRE         | Comes from the pole at a downward angle  |
+----------------------+------------------------------------------+
| DRIP LOOP (DIP)      | Curves BELOW the bottom of the cap      |
+----------------------+------------------------------------------+
| SERVICE ENTRANCE CAP | Wires enter UPWARD into the hood ports   |
+----------------------+------------------------------------------+
| CONDUIT MAST         | Directs dry wires down to the meter pan  |
+-----------------------------------------------------------------+
The Physics of Water Shedding
Utility wires must sag below the bottom level of the service entrance cap before turning upward to enter the hood ports. This downward dip is the drip loop.
When rain hits the overhead utility wires, gravity pulls water droplets down along the wire jacket. Because the drip loop sits lower than the entry cap, water collects at the bottom of the loop and drips harmlessly onto the ground below, rather than following the wire directly inside the cap housing.
Pro Tip: If you ever notice utility service wires sloping straight down into a weatherhead without a distinct bottom curve, contact your local utility company or a licensed electrician immediately. Without a proper drip loop, rainwater will use your service wires like a highway directly into your electrical meter pan.
Diagnostic Protocol: Spotting Weatherhead Damage Early
You don’t need to climb a ladder to perform an initial safety inspection. A simple ground-level audit using binoculars can reveal early warning signs of service entrance degradation.
Ground-Level Inspection Steps
-
Check the Hood Orientation: The hooded snout of the cap must point directly downward toward the ground. If storm winds or fallen branches have twisted the hood sideways or upward, rain will blow straight into the opening.
-
Inspect the Insulator Plate: Look at the faceplate where the wires enter the cap. If you see broken plastic, crumbling Bakelite, or missing dividers between wires, the conductors are at risk of chafing against raw metal edges.
-
Scan for Rust and Corrosion: Look for reddish rust stains running down the outside of the vertical conduit or tracking down the side of your home’s siding directly below the weatherhead.
Hidden Danger Alert: Never touch, climb near, or attempt to repair an active overhead service wire or service entrance cap yourself! Utility drop lines carry high-amperage current straight from the transformer without fuse protection. Always hire a licensed master electrician and coordinate with your power utility to de-energize the service line before servicing mast components.
Preventative Care and Electrical Integrity Checklist
Keep your home’s electrical point-of-entry safe and dry by following this routine inspection checklist:
-
[ ] Perform a ground-level visual inspection of the service head after severe ice or wind storms.
-
[ ] Verify that utility drop wires form a distinct downward curve (drip loop) below the cap height.
-
[ ] Ensure nearby tree branches are trimmed back at least 10 feet from the service mast and overhead wires.
-
[ ] Confirm that the weatherhead hood is securely clamped and pointing straight down toward the ground.
-
[ ] Replace any cracked PVC or rusted iron service caps with modern corrosion-resistant cast aluminum units.
-
[ ] Inspect the electrical meter pan and main panel for any subtle signs of moisture, chalking, or rust.
Protecting your main electrical entrance with a fully functional service entrance cap is one of the most critical, high-stakes aspects of home maintenance. By ensuring water is shed away from your service mast and keeping incoming conductors isolated, you safeguard your entire home against unexpected power outages, costly panel corrosion, and severe electrical hazards.
When was the last time you looked up at where utility power enters your roofline? Have you ever noticed water or rust near your electrical panel? Drop a comment below with your setup or any questions—I’d love to help you troubleshoot your setup!