It takes exactly two seconds to ruin a ten-thousand-dollar exterior paint job, crack a premium vinyl siding panel, or crush a seamless aluminum gutter. I watched it happen early in my career: a technician set up a standard extension ladder against a freshly coated, high-end stucco wall. He climbed up with a tool belt, and as his weight shifted, the raw aluminum rails of the ladder ground directly into the curing surface. The result? Two deep, ugly gouges right at eye level, a furious homeowner, and a costly day of uncompensated repair work.
In my ten-plus years managing home improvement projects and structural retrofits, I have learned that true craftsmanship isn’t just about the work you perform—it is about the collateral damage you prevent. Ladders are essential tools, but by design, they concentrate hundreds of pounds of pressure onto two tiny contact points.
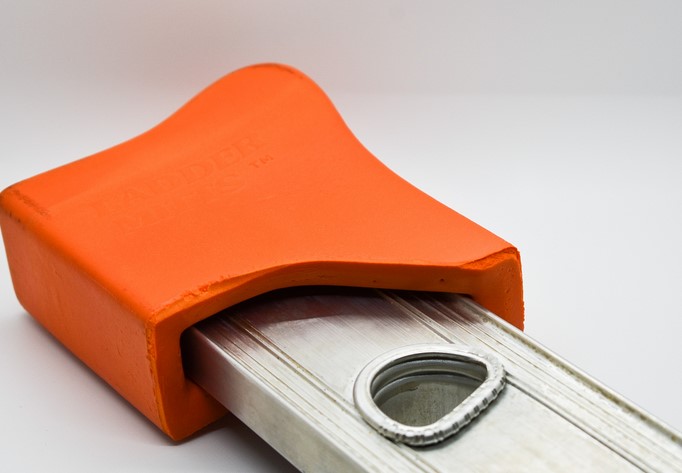
Fortunately, a simple piece of asset protection engineering can eliminate this risk entirely: Ladder Mitts Rubber accessories. Let’s dive deep into why these simple protective covers are a non-negotiable addition to your tool shed or utility truck.
The Physics of Contact Pressure: Why Bare Ladders Destroy Surfaces
To appreciate the value of Ladder Mitts Rubber, you have to understand the mechanical forces at play when a ladder rests against a building. This is a classic problem of load distribution.
Think of a bare aluminum extension ladder like a pair of high-heeled shoes stepping onto soft wood. All the weight of the ladder, plus the dynamic weight of the climber shifting back and forth, is concentrated entirely on the sharp, narrow edges of the rail tops. This creates an incredibly high pounds per square inch (PSI) metric at the contact point.
When you slide a set of engineered rubber mitts over those raw rails, you are effectively swapping those high heels for snowshoes. The flexible rubber construction significantly expands the surface area of the contact points. By widening the footprint, you disperse the force across a much larger area, drastically lowering the PSI and neutralizing the threat of surface indentation.
Material Matters: The Technical Advantage of Ladder Mitts Rubber
Not all ladder bumpers are created equal. You will often see cheap, foam-based alternatives on the market, but in a professional setting, they fail almost instantly under real-world shear stresses.
True Ladder Mitts Rubber accessories are fabricated from heavy-duty, non-marring synthetic rubber compounds (often utilizing urethane or specialized EPDM blends). This material matrix offers three critical engineering advantages:
-
Tear and Abrasion Resistance: Unlike foam, which shreds the moment it is dragged across brick or rough stucco, high-density rubber resists frictional wear, keeping its structural integrity intact over hundreds of uses.
-
High Kinetic Friction (Anti-Slip): Aluminum on vinyl or wet wood is incredibly slick. Specialized rubber provides a high coefficient of friction, meaning it firmly “grips” the surface. This dramatically reduces the risk of the ladder sideways-slipping while you are working up high.
-
Non-Marring Chemistry: Cheap plastics and low-grade rubbers contain oils that can leach out under the sun, leaving permanent dark stains on white siding or trim. True non-marring rubber is chemically stabilized to leave absolutely zero residue behind.
Step-by-Step Logistics: Installing and Deploying Rubber Mitts Safely
Integrating these protective covers into your workflow is incredibly straightforward, but like any piece of safety or asset-protection gear, correct deployment is essential.
1. Inspecting the Ladder Rail Tips
Before sliding your Ladder Mitts Rubber caps onto the ladder, take a close look at the top aluminum profile of your extension ladder. Over time, these edges can become burred, sharp, or jagged from rough handling.
-
The Action: Use a metal file to smooth down any sharp metal burrs. If you don’t, those sharp edges will slowly slice through your rubber mitts from the inside out under the pressure of your weight.
2. Ensuring a High-Tolerance Snug Fit
Slip the mitts completely over the rail tops. They should fit tightly, requiring a bit of a push to seat fully.
-
The Warning: Never use oversized mitts that wobble or slide off easily. If there is play between the rubber and the metal rail, the ladder can shift independently inside the mitt while you are climbing, creating an unstable work platform.
+-------------------------------------------------------------+
|               PROPER LADDER MITT DEPLOYMENT                 |
+-------------------------------------------------------------+
|       [Structure Wall]                                      |
|              ^                                              |
|              |  <- High-friction, non-marring contact       |
|       +--------------+                                      |
|       | Rubber Mitt  |                                      |
|       +--------------+                                      |
|       | Aluminum Rail| <- Deeply seated inside the cap       |
|       +--------------+                                      |
+-------------------------------------------------------------+
3. Setting the Correct Lean Angle
Even with rubber mitts installed, your setup geometry matters. Always adhere to the standard 4:1 ladder safety ratio (for every four feet of vertical height, the base of the ladder should be moved back one foot from the wall). This angle ensures that the weight is distributed properly through the ladder legs while maintaining just enough perpendicular pressure against the wall to allow the rubber to grip firmly without crushing the substrate.
🛠️ Pro Tips from the Field
The Debris Trap: Always wipe down the face of your rubber mitts before leaning them against a wall. Because the rubber is grippy, it can easily pick up sand, metal shavings, or coarse grit from the bed of your truck. If you lean a dirty mitt against a smooth surface, that trapped grit acts exactly like coarse sandpaper, scratching the surface you are trying to protect.
The Siding Danger Zone: Be incredibly cautious when leaning ladders on hollow vinyl siding during freezing temperatures. Vinyl becomes highly brittle in the cold. While Ladder Mitts Rubber will distribute the weight, you should still attempt to place the contact points directly over the solid framing studs behind the siding rather than right in the middle of a hollow, unbacked panel span.
Maintenance and LifesPAN Logistics
A good set of rubber ladder mitts will last for years if cared for properly. Treat them as safety gear rather than disposable plastic trash.
Cleaning Protocols
If your mitts accumulate paint overspray, caulking residue, or mud, do not clean them with harsh chemical solvents like acetone or paint thinner. These solvents break down the polymer chains within synthetic rubber, causing it to become gummy, soft, and structurally compromised. Instead, use warm water, a mild dish soap, and a stiff nylon brush to restore the rubber’s high-friction surface.
When to Retire Your Mitts
Inspect your gear before every project. Look for deep gouges, dry-rotting cracks from UV exposure, or signs that the inner aluminum rail has finally worn through the rubber barrier. The moment you see the silver glint of aluminum peeking through the interior base of the mitt, discard it immediately and grab a fresh pair.
Small Investment, Industrial-Grade Protection
In the world of property preservation and home renovation, the difference between a clumsy amateur and a seasoned professional always comes down to the details. Spending a few dollars on a high-quality set of Ladder Mitts Rubber accessories saves you thousands of dollars in property damage, protects your professional reputation, and adds an extra layer of structural stability to your high-altitude work. It is asset protection engineering at its simplest and most effective.
Have you ever had a close call or a costly mistake with an unprotected ladder on a job? What surface gives you the most anxiety when setting up your gear? Let’s talk about it in the comments below—I’d love to share some specific site setups with you!