Thermal Regulation Efficiency: Enhancing Attic Ventilation via the Attic Solar Fan

Source:https://chinaexhaustfan.com

It’s 2:00 PM in the middle of July. Your air conditioner is screaming, running at full tilt, yet the upstairs bedrooms still feel like a literal sauna. You touch the ceiling, and it’s warm to the touch. In my decade of climbing into suffocating crawlspaces, I’ve seen attics hit staggering temperatures of 150°F (65°C) while it’s only 90°F outside.

That massive reservoir of trapped heat isn’t just making you sweat; it’s cooking your roof shingles from the inside out and forcing your AC to work 20% harder than it was designed to. Most homeowners think more insulation is the answer, but insulation without ventilation is just a thick blanket over a fever. The real game-changer I’ve installed time and again is the Attic Solar Fan.


The Physics of the “Oven Effect”

To understand why an Attic Solar Fan is so effective, you have to understand the “Oven Effect.” Your roof acts like a giant solar collector. It absorbs radiant heat and transfers it into the attic space. Without active airflow, that heat stays there, radiating through your floor joists and into your living space.

The Convection Analogy

Think of your attic like a car parked in the sun with the windows cracked just a tiny bit. It’s better than nothing, but it’s still dangerously hot. Installing an Attic Solar Fan is like opening the doors and turning on a high-powered blower. It converts passive, stagnant air into an active, moving stream.


Why the Attic Solar Fan is a Strategic Upgrade

In the world of home improvement, we talk a lot about ROI (Return on Investment). Passive vents (like ridge vents or soffit vents) rely entirely on the hope that hot air will rise and exit on its own. But on a windless, humid day, hope isn’t a strategy.

1. Active vs. Passive Air Exchange

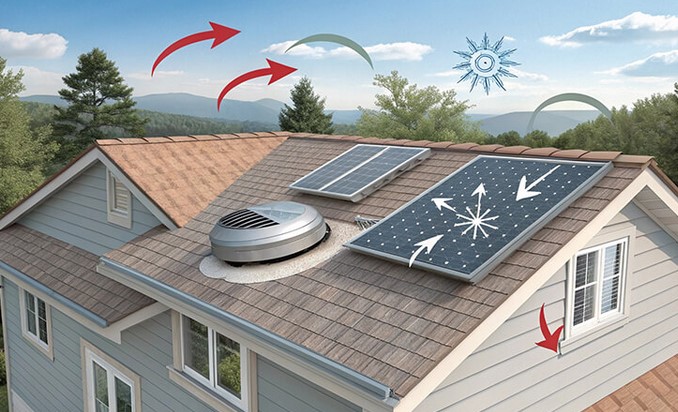
The Attic Solar Fan uses a photovoltaic panel to power a high-torque motor. The beauty of this design is that it works hardest when the sun is brightest—exactly when your attic temperature is peaking. It forces the hot air out, creating a vacuum that pulls cooler outside air in through your intake vents.

2. Zero Operating Costs

Unlike traditional electric power gable fans, which can add $10–$20 a month to your utility bill, a solar-powered unit runs on “free” energy. Once it’s on your roof, it’s a set-it-and-forget-it system that pays for itself through reduced cooling loads.


Technical Specifications: What to Look For

After inspecting hundreds of installations, I’ve learned that not all solar fans are created equal. If you’re a beginner or intermediate DIYer, keep these technical LSI terms in mind when shopping:

  • CFM Rating (Cubic Feet per Minute): This is the measure of how much air the fan moves. For a standard 1,500 sq. ft. attic, you generally want a fan rated for at least 1,000 to 1,200 CFM.

  • Monocrystalline Solar Panels: These are more efficient and durable than polycrystalline panels. Look for a unit with an adjustable panel so you can angle it toward the southern sun for maximum juice.

  • Brushless DC Motors: These are significantly quieter and have a much longer lifespan than brushed motors. In my experience, a brushless motor can last 15+ years without a hitch.

  • Thermal Switches: A high-quality Attic Solar Fan should include a thermostat. You don’t necessarily want it running in the dead of winter when you actually want to keep some heat in the house.


Installation Insights: Avoid the Common Pitfalls

I’ve been called to “fix” many DIY solar fan installs, and the mistakes are almost always the same.

The Importance of “Intake”

A fan is only as good as the air it can pull in. If your soffit vents are clogged with old insulation or painted shut, the fan will struggle. It will create a negative pressure zone and might actually pull air-conditioned air from your house through recessed lights or cracks in the ceiling.

Pro Tip: Before installing your fan, go into the eaves with a flashlight and ensure your soffit vents are clear. Use “baffles” to keep insulation from blocking the airflow.

Placement Strategy

You want the fan installed as high as possible on the roof—near the ridge—but away from any existing ridge vents. If it’s too close to a ridge vent, it will simply pull air from that vent and “short circuit,” leaving the rest of the attic stagnant.


Expert Advice: The “Hidden” Benefit of Moisture Control

Most people buy an Attic Solar Fan for the summer cooling, but I actually value them just as much for winter protection.

  • Humidity Mitigation: In the winter, warm air from your shower or kitchen leaks into the attic. If that moisture hits the cold underside of your roof deck, it condenses into water.

  • Mold Prevention: This moisture leads to “attic mold” and wood rot.

  • Ice Dam Prevention: By keeping the attic temperature closer to the outside temperature, a solar fan helps prevent the snow on your roof from melting and refreezing at the gutters—the primary cause of destructive ice dams.


The “Shade” Factor

Here is something the glossy brochures won’t tell you: Trees grow. I once returned to a client’s home five years after an install. They complained the fan wasn’t working. It turned out their beautiful oak tree had grown three feet higher, casting a shadow over the solar panel for six hours a day.

Always look at the “solar path” of your roof across all seasons before drilling that hole.


Summary of Benefits

Feature Passive Ventilation Attic Solar Fan
Energy Source Natural Convection Solar Energy (Free)
Airflow Speed Low/Minimal High (Active)
Installation Medium Difficulty Medium (Requires Roof Cut)
Maintenance None Minimal (Panel Cleaning)
Impact on AC Slight Significant Reduction

Elevate Your Home’s Efficiency

Adding an Attic Solar Fan is one of the few home improvements that protects your roof, saves you money on utilities, and increases your daily comfort simultaneously. It’s an elegant solution to a brutal problem.

If you’ve noticed your AC running non-stop or your upstairs feeling like a furnace, it’s time to stop ignoring the space above your head. Modern solar fans are quieter and more powerful than ever, making them a must-have for any homeowner looking to optimize their “thermal envelope.”

Is your attic working against you or for you? If you’re unsure about which CFM rating fits your roof pitch or need advice on the best placement for your specific climate, leave a comment below. I’ve seen every roof type imaginable, and I’m happy to help you get that air moving!

Structural Integrity Mitigation: Precision Application of Foundation Crack Filler

Source:https://www.hydrohelp911.com

It starts with a thin, jagged line in the corner of the basement—hardly thicker than a strand of hair. Most homeowners look at it and think, “I’ll get to that next summer.” But as someone who has spent over a decade crawling through damp crawlspaces and inspecting cracked slabs, I can tell you that a crack is rarely just a cosmetic flaw; it’s a symptom of a house that’s “breathing” under immense pressure.

I once visited a client who had ignored a vertical crack for three years. By the time I arrived, a heavy spring rain had turned that “hairline” into a high-pressure garden hose, flooding a finished basement and causing $15,000 in water damage. The solution could have been a simple tube of Foundation Crack Filler and two hours of work. Today, we’re going to make sure that doesn’t happen to you.


The Anatomy of a Crack: When to Worry

Before you reach for a caulk gun, you need to understand what you’re looking at. Houses naturally settle, but not all cracks are created equal. Think of your foundation like the “spine” of your home. A small scratch on the skin is fine, but a slipped disc requires immediate precision.

Vertical vs. Horizontal Cracks

  • Vertical Cracks: Usually caused by the natural settling of the concrete. These are the “scratches” and are the primary candidates for a high-quality Foundation Crack Filler.

  • Diagonal Cracks: Often indicate “differential settling,” where one side of the house is sinking faster than the other.

  • Horizontal Cracks: The Red Flag. These often signal hydrostatic pressure—the earth outside is literally pushing your walls inward. If you see these, put down the filler and call a structural engineer immediately.


Choosing Your Weapon: Types of Foundation Crack Filler

In my early days, I made the mistake of using standard concrete patch for everything. I quickly learned that rigid patches often fail because they don’t account for the house’s movement. You need a material that is as stubborn as the concrete but as flexible as a gymnast.

1. Polyurethane Foam Injection

This is my go-to for leaking cracks. When injected, the polyurethane expands to fill the entire depth of the wall, from inside to outside. It’s like “Great Stuff” insulation on steroids. It stays flexible, meaning if the house shifts by a fraction of a millimeter, the seal won’t snap.

2. Epoxy Resins

If the crack is threatening the structural integrity (but isn’t leaking water), epoxy is the king. Once it cures, it is actually stronger than the original concrete. It effectively “welds” the two sides of the crack back together.

3. Vinyl Concrete Patch

Best for superficial, wide cracks where water isn’t an issue. It’s easy to apply for beginners but lacks the deep-sealing power of injections.


The Step-by-Step Guide to Precision Application

Applying Foundation Crack Filler is a ritual. If you rush the prep, the product will peel off within a season. Here is the “Expert Way” to do it.

Phase 1: The “Surgical” Clean

You cannot bond new material to old dust. I use a stiff wire brush to scrub the crack until the gray concrete shines.

  • Pro Tip: Use a vacuum or compressed air to blow out the deep recesses. If there is loose “efflorescence” (white, powdery salt deposits), scrub it with a mixture of water and vinegar. If those salts remain, your filler will never stick.

Phase 2: Installing the Injection Ports

For deep cracks, we use an injection kit. You’ll glue small plastic “ports” every 8-12 inches along the crack.

  • The Analogy: Think of these ports like the buttons on a shirt. They allow you to feed the filler directly into the heart of the wall without making a mess on the surface.

Phase 3: Sealing the Surface

Before injecting the main Foundation Crack Filler, you must apply a “surface seal” (usually a thick epoxy paste) over the crack and around the base of the ports. This creates a pressurized “tunnel.”

  • Wait for it: Let this surface seal cure completely. If you start injecting too early, the pressure will blow the seal right off the wall, and you’ll have epoxy in your hair.

Phase 4: The Bottom-Up Injection

Start at the lowest port. Inject the filler until you see it start to ooze out of the port directly above it. Cap the bottom port, move up, and repeat. This ensures there are no air pockets left behind.


Critical Factors: Hydrostatic Pressure and Soil Moisture

As a home improvement expert, I always tell people that the Foundation Crack Filler is only half the battle. If you don’t fix why the crack started, it will just happen again six feet down the wall.

  • Gutter Management: 90% of foundation issues are actually gutter issues. If your downspouts are dumping water right at the base of your wall, you’re creating a swamp that pushes against your house.

  • Grading: The ground should slope away from your home at a rate of at least 6 inches every 10 feet.


Expert Advice: The “Hidden Warning”

Here is something you won’t find on the back of the bottle: Never fill a crack while it is actively leaking. Most DIY Foundation Crack Filler products require a dry surface to bond. If water is currently trickling in, the pressure will push the filler out before it cures. You need to wait for a dry spell or use a specific “hydrophilic” grout that actually uses the water to trigger the chemical reaction.

Essential Tools for the Job

To do this like a pro, gather these items before you start:

  • Safety Gear: Nitrile gloves and safety glasses (epoxy is a nightmare to get off skin).

  • Wire Brush: For aggressive cleaning.

  • Caulk Gun: High-ratio guns are better for thick epoxies.

  • Low-Pressure Injection Kit: Usually contains the ports, surface seal, and the Foundation Crack Filler tubes.

  • Putty Knife: For smoothing the surface seal.


Summary: Protecting Your Biggest Investment

Your home is likely your most valuable asset. Treating a foundation crack with a precision application of Foundation Crack Filler is like giving your house a “preventative surgery.” It stops the rot before it starts and maintains the value of your property.

Don’t be intimidated by the technical nature of concrete repair. With the right prep and the right materials, even a beginner can achieve a professional-grade seal that will last for decades.

Have you noticed a suspicious line in your basement lately? Measure the width and tell me which direction it’s running in the comments below—I’ll tell you if it’s a DIY fix or time to call in the heavy machinery!