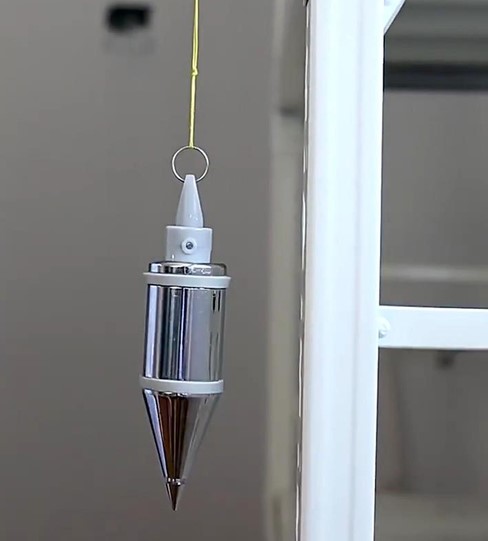
Imagine spending weeks framing a gorgeous custom timber wall or hanging heavy kitchen cabinetry, only to step back, close one eye, and realize your entire structure is leaning by a fateful half-inch. That sinking feeling in your stomach? I’ve lived it early in my contracting career, and it usually happens because someone trusted a cheap, uncalibrated bubble vial over pure physics.
In an era dominated by flashing lasers, digital angle finders, and smartphone apps, it is easy to overlook the ancient instruments that built the pyramids, cathedrals, and skyscrapers of the modern world. But across my 10+ years running job sites and fixing structural framing mistakes, I’ve learned one immutable truth: when absolute vertical alignment is non-negotiable, the humble plumb bob tool remains the most reliable master on site.
Let’s dive into why this low-tech classic outperforms high-tech gadgets and how you can master its use for flawless project execution.
The Physics of Gravity: Why the Plumb Bob Tool Never Lies
Many beginners assume that modern electronic levels are always superior because they feature glowing digital readouts. However, digital sensors can drift, batteries die, and temperature fluctuations can warp internal components. A plumb bob tool, by contrast, relies on a force that has been operating reliably for 4.5 billion years: gravity.
Think of a plumb bob like an absolute compass pointing toward the center of the Earth. It doesn’t care about uneven subfloors, dead batteries, or job site vibrations. It cuts straight through guesswork to establish a true vertical datum line.
Understanding the Vertical Vector
When you suspend a weighted, pointed mass from a fixed string, the mass naturally centers itself along the Earth’s gravitational pull. This creates a zero-error baseline known as the plumb line.
-
Zero Calibration Required: Unlike laser levels that require frequent factory re-calibration, a solid metal plumb bob is instantly accurate out of the box.
-
Immune to Optical Illusion: Bright job site lighting can wash out laser lines, but a physical string and heavy point remain clearly visible across long spans.
Anatomy and Selection of a Quality Plumb Bob Tool
Not all weights dangling from a string are created equal. When I look for a reliable plumb bob tool in my gear bag, I evaluate specific design criteria that separate professional-grade metrology equipment from cheap hardware store novelties.
Key Features of a Professional Plumb Bob
-
Precision-Machined Point: The tip must be perfectly centered on the longitudinal axis. If the tip is off-center by even a millimeter, your entire layout shifts.
-
Material Density: Solid brass or hardened steel provides optimal weight-to-volume ratio, making the bob less susceptible to minor air drafts while keeping the profile slim.
-
Top Cap Swivel: A high-quality tool features a threaded cap with a swivel eyelet, allowing the string to rotate freely without introducing twist memory into the line.
Material Comparison: Brass vs. Steel vs. Cast Iron
| Material | Balance & Precision | Corrosion Resistance | Best For |
| Solid Brass | Exceptional (Machined to tight tolerances) | High (Does not rust) | Fine finish carpentry, layout work |
| Hardened Steel | High (Durable against drops) | Moderate (Requires light oiling) | Rough framing, heavy construction |
| Cast Iron | Moderate (Bulkier profile) | Low | General utility, budget DIY |
Step-by-Step Guide: How to Use a Plumb Bob Tool Like a 10-Year Pro
Deploying a plumb bob tool effectively comes down to controlling variables like wind, swing momentum, and parallax error. Here is the exact workflow my crew uses on site.
Step 1: Choose the Right Line
Never use stretchy nylon string or thick twine. Use a tightly braided, non-stretch mason’s line or specialized thin braided nylon. A thin line minimizes wind resistance and provides a razor-sharp sighting edge.
Step 2: Establish the Anchor Point
Secure your string firmly to a batter board, ceiling joist, or a specialized framing bracket. Ensure the anchor point is completely rigid so the string’s pivot point cannot shift during measurement.
Step 3: Stop the Oscillation
Once suspended, a plumb bob naturally swings like a pendulum. To stop the swinging quickly without touching it, hold a bucket of water or oil directly beneath the tip and let the bob dip slightly into the liquid. Surface tension will instantly damp the motion.
Step 4: Measure the Offset
Measure the horizontal distance from your reference structure to the string line at multiple points (top and bottom). If the measurements match down to the millimeter, your wall or post is plumb.
Hidden Pitfalls and Field Warnings
Even experienced builders can introduce errors if they ignore environmental factors. Watch out for these hidden traps:
-
The Draft Trap: Even a gentle breeze blowing through an open window frame can push a lightweight plumb bob sideways by a quarter-inch. Always shield your workspace from cross-breezes when doing precision layout.
-
Parallax Error: When sighting your line against a tape measure or wall mark, ensure your eye is directly perpendicular to the mark. Viewing from an angle will throw off your reading.
Pro Tips from a Decade on Site
-
Protect the Tip: The pointed tip is the heart of the tool. If you drop a solid brass bob on concrete and bend the tip, it is instantly ruined. Always store it in a protective leather pouch or tool roll.
-
Magnetic Assistants: If you work frequently with steel studs or metal beams, invest in a magnetic plumb bob release. It lets you snap the tool instantly onto steel structures while keeping your hands free.
Bringing Absolute Accuracy to Your Next Build
Mastering the plumb bob tool bridges the gap between amateur guesswork and professional craftsmanship. By respecting the laws of gravity and utilizing proper setup techniques, you ensure that every wall, column, and door frame you install stands straight and true for decades to come.
The next time you tackle a major framing or alignment project, don’t rely solely on digital screens. Trust the timeless accuracy of a weighted line, and enjoy the confidence of absolute precision.
What’s Your Go-To Alignment Method?
Have you ever faced a tricky framing alignment challenge where modern gadgets failed you? Drop a comment or question below! I would love to hear about your current projects and share practical advice to help you build better.