Picture this: It is the first freezing night of autumn. You strike a match, ignite a stack of seasoned oak, and settle into your armchair, ready to enjoy the cozy crackle of your fireplace. Within minutes, a strange, suffocating odor fills the room, followed rapidly by panicked chirping and a panicked squirrel dropping straight out of your flue onto your living room rug.
I have seen this exact scenario play out more times than I care to admit across my decade in the home improvement trenches. Homeowners invest thousands in beautiful interior living spaces, designer mantels, and high-efficiency inserts, yet they completely ignore the literal crown of their house until disaster strikes.
If you want to protect your masonry, prevent animal invasions, and ensure proper home safety, mastering a professional chimney cap install is one of the highest-return weekend projects you can tackle. Let’s break down the engineering behind this critical home asset.
The Hidden Vulnerability of an Open Flue
Many beginners assume that a chimney is simply an open pipe designed to let smoke escape upward. In reality, an unprotected flue acts like a giant funnel pointed straight at the sky, welcoming rain, snow, debris, and wildlife straight into the heart of your home structure.
Think of an uncapped chimney like leaving the sunroof of your car open while parked in a dense forest during a rainstorm. Within months, pooled moisture interacts with soot and creosote accumulation to form acidic compounds that literally eat away at your masonry from the inside out.
The Cycle of Destruction: Water Infiltration and Freeze-Thaw
Without a proper barrier, rainwater pours directly onto the smoke shelf and dampens the clay flue tile. When winter temperatures plunge below freezing, that trapped moisture expands with immense hydraulic pressure.
-
Spalling Brickwork: Freeze-thaw cycles cause masonry crowns and bricks to crack, flake, and crumble.
-
Rusting Dampers: Standing water corrodes cast-iron dampers, causing them to warp and jam shut.
-
Structural Compromise: Once water penetrates the flue liner joints, it weakens the structural integrity of the entire chimney stack.
The Engineering Behind a Proper Chimney Cap Install
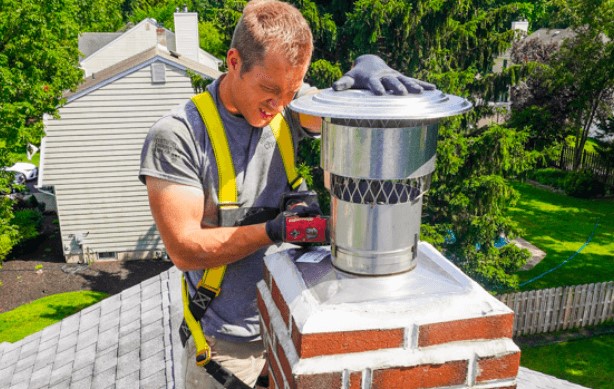
A high-grade chimney cap is not just a decorative metal lid; it is a precision ventilation and safety device. When executed correctly, a chimney cap install balances three vital engineering functions: water deflection, animal exclusion, and spark arrestance.
Key Components of an Effective Cap
-
Rain Deflector Hood: A sloped top lid that sheds driving rain and snow away from the flue opening while allowing unobstructed exhaust ventilation.
-
Spark Arrester Mesh: Heavy-duty wire screening (usually 1/2-inch or 3/4-inch mesh) that catches flying embers and sparks before they can ignite your roof shingles or nearby trees.
-
Base Flange: The secure mounting skirt that fastens tightly over the clay flue tile or mounts directly to the concrete crown.
Choosing the Right Materials for Longevity
Before starting your chimney cap install, material selection is critical. In the home improvement industry, I always advise clients to buy once and cry once.
| Material | Lifespan | Maintenance | Best For |
| Galvanized Steel | 3–5 Years | High (prone to rapid rusting) | Short-term budget fixes |
| Stainless Steel (Grade 304) | Lifetime | Virtually Zero | Standard residential use (Recommended) |
| Copper | Lifetime+ | Low (develops a rich patina) | Premium architectural aesthetics |
Step-by-Step Guide: How to Execute a Chimney Cap Install Like a Pro
Climbing onto a roof requires absolute respect for safety. Always use a stable extension ladder, wear non-slip footwear, and harness up if working on steep pitches. Here is the exact installation workflow my crew follows.
Step 1: Inspection and Exact Measurements
Measure the outer dimensions of your clay flue tile precisely. A cap that is too large will rattle in high winds, while an undersized cap will restrict draft dynamics and cause smoke to back up into your living room.
Step 2: Clean and Prep the Flue Surface
Scrape away old crumbling mortar, moss, and soot from the top of the flue tile and concrete crown using a wire brush. Wipe the surface clean so that your mounting seal establishes maximum bond strength.
Step 3: Position and Secure the Cap
Lower the cap onto the flue tile, ensuring the mesh screen does not obstruct the exhaust opening. Tighten the corner compression bolts or masonry tap-con screws evenly in a criss-cross pattern.
Pro Tip: Do not overtighten the mounting screws on a clay tile! Clay is brittle; snug them down firmly enough to hold against 60 mph winds, but avoid crushing the ceramic wall.
Step 4: Seal the Perimeter
Apply a heavy bead of high-temperature, exterior-grade silicone or polyurethane masonry caulk around the base flange and crown joint to lock out moisture permanently.
Pro Tips and Hidden Warnings from the Field
Even experienced DIYers can run into unexpected snags during a chimney cap install. Keep these field-tested warnings in mind:
-
The Draft Check Warning: If your fireplace begins smoking indoors immediately after installing a cap, your mesh screen might be too fine or clogged with soot. Ensure your mesh spacing meets local building codes (usually 1/2-inch spacing).
-
Multi-Flue Realities: If your chimney has multiple flues (e.g., fireplace plus a furnace flue), never use a single small cap on each unless they are staggered. Opt for a custom multi-flue cover that spans the entire concrete crown for uniform protection.
Securing Your Home from Top to Bottom
A successful chimney cap install is one of the most satisfying weekend home improvement projects you can complete. For a minimal investment of time and materials, you safeguard your roof structure, eliminate unwanted animal guests, and extend the lifespan of your heating system by decades.
Don’t wait for the next heavy storm or a midnight wildlife wakeup call to address your chimney’s vulnerability. Take control of your home maintenance today and enjoy peace of mind all year round.
What’s Your Next Home Improvement Project?
Have you ever dealt with water leaks or unexpected critters in your chimney system? Drop a comment or question below! I would love to hear about your current renovation challenges and share practical advice to help you tackle them like a seasoned pro.