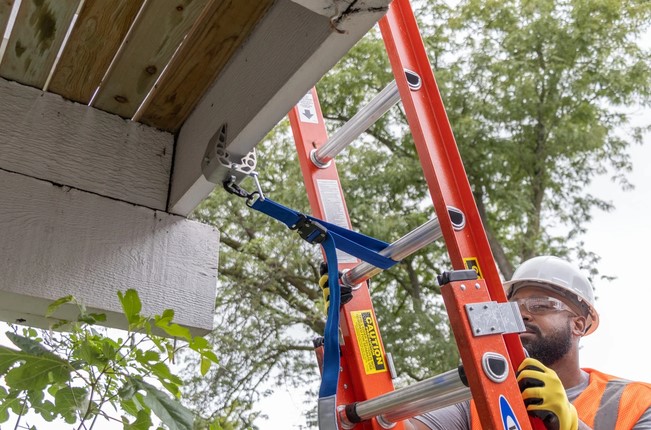
Picture yourself 20 feet up in the air on an extension ladder, holding a heavy can of stain or a power tool. Just as you reach for that top corner of your home’s exterior fascia, the top of the ladder shifts an inch to the side, grinding against the gutter. Your heart leaps into your throat, your knuckles turn white, and you realize you are one awkward movement away from becoming another statistic in emergency room records.
Over my 10+ years working on residential job sites, I have seen ladder anxiety paralyze eager DIYers and seasoned tradespeople alike. According to industrial safety data, ladder falls remain one of the leading causes of home improvement injuries annually—often caused not by structural ladder failure, but by lateral sliding and unstable contact points at the top.
If you want to eliminate that terrifying wobble, protect your vinyl siding and gutters, and work at height with absolute confidence, adding a high-grade ladder stabilizer bracket to your kit is non-negotiable. Let’s explore the engineering behind this essential safety device and how to deploy it like a seasoned professional.
The Mechanical Physics of High-Reach Stability
Many homeowners assume that anchoring the feet of an extension ladder on flat ground is enough to keep it stable. However, as you climb higher, the ladder’s center of gravity shifts upward, turning the top contact point into a delicate pivot axis.
Think of an unassisted ladder like balancing a pencil on your fingertips—if the top tip shifts off-center by even a hair, gravity amplifies the movement down the entire length. A ladder stabilizer bracket acts like the wide training wheels on a bicycle, extending your contact stance horizontally by two to four feet and transferring weight away from fragile surfaces directly onto solid structural wall studs or roof decking.
How a Ladder Stabilizer Bracket Re-Engineers Load Distribution
-
Expanded Stance Width: By spreading the support arm span up to 48 inches wide, the bracket dramatically reduces the risk of lateral tip-overs caused by reaching or high winds.
-
Surface Clearance: It pushes the ladder 10 to 12 inches away from the wall, giving you room to maneuver paint rollers, clean gutters, or inspect soffits without working at awkward, cramped angles.
-
Gutter Preservation: Instead of resting hundreds of pounds of total weight directly on thin aluminum or vinyl gutters, the bracket bridges across window openings and rests on surrounding wall studs.
Selecting the Right Ladder Stabilizer Bracket for Your Rig
Not every accessory fits every ladder type. When purchasing or configuring a ladder stabilizer bracket, you must evaluate your primary work surface and duty rating.
Key Types of Stabilizer Attachments
-
Fixed-Width Tubular Stabilizers: The standard choice for exterior painting and window cleaning. Lightweight aluminum construction makes them easy to attach to standard rung locks without adding excessive weight to your climb.
-
Adjustable Quick-Release Stabilizers: Feature telescoping arms that adjust to span wide window frames or fit narrow roof valley corners. They use spring-loaded locking pins for rapid, tool-free installation.
-
Heavy-Duty Roof-Off Standoffs: Built specifically for roof inspection and shingle repair, these extended brackets rest securely on roof slopes, allowing you to step smoothly off the ladder onto the roof decking without pushing on vulnerable eaves.
Material & Duty Rating Comparison
| Bracket Material | Weight Added | Load Capacity | Ideal Applications |
| High-Grade Aluminum | ~4 to 6 lbs | Matches Type IA / IAA (300–375 lbs) | Residential painting, gutter maintenance, siding |
| Heavy-Duty Steel | ~8 to 12 lbs | Matches Type IAA (375 lbs+) | Heavy commercial construction, masonry work |
Step-by-Step Guide: Deploying Your Ladder Stabilizer Bracket
Installing a ladder stabilizer bracket incorrectly can create a false sense of security. Here is the exact procedure my crew uses to ensure flawless, rock-solid vertical setup every single time.
Step 1: Inspect the Connection Points
Before attaching the bracket, inspect the rubber end pads for cracks, embedded gravel, or grease. Clean or replace damaged silicone pads to prevent slick contact and scratch marks on your siding or brickwork.
Step 2: Lock the Bracket to the Top Rungs
Attach the mounting U-bolts or quick-clamp mechanisms to the top two rungs of your extension ladder while it is laying flat on the ground. Ensure the safety locking pins or wing nuts are torqued down firmly so there is zero play between the bracket and the ladder rungs.
Step 3: Set the 4-to-1 Pitch Rule
Raise the ladder with the attached bracket. Position the base using the standard safety ratio: for every 4 feet of vertical height to the contact point, the base of the ladder should sit 1 foot away from the wall.
Pro Tip: When using a ladder stabilizer bracket, calculate your 4-to-1 angle from the wall surface where the rubber pads rest, not from the roof eave or gutter edge!
Step 4: Verify Both Contact Pads Sit Flush
Before stepping on the first rung, glance up to confirm that both left and right rubber pads make full, firm contact with the wall or roof surface. If one pad hovers slightly due to uneven ground, adjust your base levelers until both sides carry equal weight.
Hidden Pitfalls and Field Warnings
In my decade of troubleshooting job site setups, I have seen a few recurring mistakes with standoff brackets. Keep these warnings in mind:
-
The Window Glass Trap: Never position stabilizer pads directly on double-hung glass window panes or thin vinyl window casings. Always measure so the pads span cleanly onto adjacent exterior trim or solid wall studs.
-
Over-Reaching Outside the Stance: Even with a 48-inch standoff span, keep your belt buckle centered between the ladder rails. Over-reaching to the extreme edge of the bracket arm can unbalance your base alignment.
-
Ignoring Wind Shears: At heights above 15 feet, a standoff bracket catches more breeze. Always tie off the top or base of your ladder if you are working in gusty conditions.
Investing in Safety and Peace of Mind
At the end of the day, home renovation should be a rewarding, fulfilling experience—not a high-wire stress test. Equipping your setup with a rugged ladder stabilizer bracket transforms high-reach tasks from intimidating chores into controlled, comfortable, professional-grade operations.
Whether you are clearing out gutters before winter, applying a fresh coat of exterior trim paint, or fixing loose fascia boards, a quality standoff bracket protects both your home’s structural assets and your personal well-being.
What’s Your Biggest Height Challenge?
Have you ever experienced ladder slippage or struggled with working around delicate gutters and windows on your property? Drop a comment or question below! I would love to hear about your home maintenance projects and help you dial in a safer, more efficient setup.